1. 建立开发系统
本指南描述了要开始 OpenNMS 项目开发所必需的要求和步骤。
1.1. 操作系统 / 环境
要 构建/编译 OpenNMS,必须运行 *nix 系统。 不一定非要是物理机,虚拟机就足够了,请酌情选择。 我们建议使用下列系统:
-
带有 Cinnamon 桌面环境的 Linux Mint
-
Mac OS X
| 本文档建议,你选择一个基于 debian 的桌面环境。 |
1.2. 安装
下一章描述了要满足预设要求的设置环境。 只要遵循这些操作说明,它们肯能根据操作系统的不同而不同。
# 添加 OpenNMS 仓库来安装 icmp,等等
echo "deb http://debian.opennms.org stable main" > /etc/apt/sources.list.d/opennms.list
echo "deb-src http://debian.opennms.org stable main" >> /etc/apt/sources.list.d/opennms.list
# 添加 pgp key
wget -O - https://debian.opennms.org/OPENNMS-GPG-KEY | apt-key add -

# 全部更新
apt-get update

# 安装 stuff
apt-get install -y software-properties-common
apt-get install -y git-core
apt-get install -y nsis

# 安装 Oracle Java 8 JDK
# 此安装基于: http://www.webupd8.org/2014/03/how-to-install-oracle-java-8-in-debian.html
add-apt-repository -y ppa:webupd8team/java
apt-get update
apt-get install -y oracle-java8-installer
apt-get install -y oracle-java8-set-default

# 安装和配置 PostgreSQL
apt-get install -y postgresql
echo "local   all             postgres                                peer" > /etc/postgresql/9.3/main/pg_hba.conf
echo "local   all             all                                     peer" >> /etc/postgresql/9.3/main/pg_hba.conf
echo "host    all             all             127.0.0.1/32            trust" >> /etc/postgresql/9.3/main/pg_hba.conf
echo "host    all             all             ::1/128                 trust" >> /etc/postgresql/9.3/main/pg_hba.conf
# 重新启动 postgres 以应用新配置
/etc/init.d/postgresql restart

# 安装 OpenNMS 基本依赖项
apt-get install -y maven
apt-get install -y jicmp jicmp6
apt-get install -y jrrd

# clone opennms
mkdir -p ~/dev/opennms
git clone https://github.com/OpenNMS/opennms.git ~/dev/opennms
之后,你就可以构建 OpenNMS:
cd ~/dev/opennms
./clean.pl
./compile.pl -DskipTests
./assemble.pl -p dir
有关如何从源代码构建 OpenNMS 的更多信息,请参考 从源代码安装 的 wiki。
成功构建 OpenNMS 之后,请参考 运行 OpenNMS 的 wiki。
1.4. 有用的链接
1.4.1. OpenNMS 相关
-
https://www.github.com/OpenNMS/opennms: 托管在 GitHub 上的源代码
-
http://wiki.opennms.org: 我们的 Wiki,尤其是开始页面很有趣。它指给你正确的方向。
-
http://issues.opennms.org: 我们的 issue/bug 跟踪。
-
https://github.com/opennms-forge/vagrant-opennms-dev: 设置 virtual box 来构建 OpenNMS
-
https://github.com/opennms-forge/vagrant-opennms: 设置 virtual box 来运行 OpenNMS
2. Minion development
2.1. Introduction
This guide is intended to help developers get started with writing Minion related features. It is not intented to be an exhaustive overview of the Minion architecture or feature set.
2.2. Container
This section details the customizations we make to the standard Karaf distribution for the Minion container.
2.2.1. Clean Start
We clear the cache on every start by setting karaf.clean.cache = true in order to ensure that only the features listed in the featuresBoot (or installed by the karaf-extender) are installed.
2.2.2. Karaf Extender
The Karaf Extender was developed to make it easier to manage and extend the container using existing packaging tools. It allows packages to register Maven Repositories, Karaf Feature Repositories and Karaf Features to Boot by overlaying additional files, avoiding modifying any of the existing files.
Here’s an overview, used for reference, of the relevant directories that are (currently) present on a default install of the opennms-minion package:
├── etc
│   └── featuresBoot.d
│       └── custom.boot
├── repositories
│   ├── .local
│   ├── core
│   │   ├── features.uris
│   │   └── features.boot
│   └── default
│       ├── features.uris
│       └── features.boot
└── system
When the karaf-extender feature is installed it will:
-
Find all of the folders listed under
$karaf.home/repositoriesthat do not start with a '.' and sort these by name. -
Gather the list of Karaf Feature Repository URIs from the
features.urisfiles in the repositories. -
Gather the list of Karaf Feature Names from the
features.bootfiles in the repositories. -
Gather the list of Karaf Feature Names form the files under
$karaf.etc/featuresBoot.dthat do not start with a '.' and sort these by name. -
Register the Maven Repositories by updating the
org.ops4j.pax.url.mvn.repositorieskey for the PIDorg.ops4j.pax.url.mvn. -
Wait up to 30 seconds until all of the Karaf Feature URIs are resolvable (the Maven Repositiries may take a few moments to update after updating the configuration.)
-
Install the Karaf Feature Repository URIs.
-
Install the Karaf Features.
Features listed in the features.boot files of the Maven Repositiries will take precedence over those listed in featuresBoot.d.
|
Any existing repository registered in org.ops4j.pax.url.mvn.repositories will be overwritten.
|
2.3. Packaging
This sections describes packages for Minion features and helps developers add new features to these packages.
We currently provide two different feature packages for Minion:
- openns-minion-features-core
-
Core utilities and services required for connectivity with the OpenNMS controller
- openns-minion-features-default
-
Minion-specific service extensions
Every package bundles all of the Karaf Feature Files and Maven Dependencies into a Maven Repository with additional meta-data used by the KarafExtender.
2.3.1. Adding a new feature to the default feature package
-
Add the feature definition to
container/features/src/main/resources/features-minion.xml. -
Add the feature name in the
featureslist configuration for thefeatures-maven-plugininfeatures/minion/repository/pom.xml. -
Optionally add the feature name to
features/minion/repository/src/main/resources/features.bootif the feature should be automatically installed when the container is started.
2.4. Guidelines
This sections describes a series of guidelines and best practices when developing Minion modules:
2.4.1. Security
-
Don’t store any credentials on disk, use the
SecureCredentialVaultinstead.
2.5. Testing
This sections describes how developers can test features on the Minion container.
2.5.1. Local Testing
You can compile, assemble, and spawn an interactive shell on the Minion container using:
cd features/minion && ./runInPlace.sh2.5.2. System Tests
The runtime environment of the Minion container and features differs greatly from those provided by the unit and integration tests. For this reason, it is important to perform automated end-to-end testing of the features.
The system tests provide a framework which allows developers to instantiate a complete Docker-based Minion system using a single JUnit rule.
For further details, see the minion-system-tests project on Github.
3. Topology
3.1. Info Panel Items
| This section is under development. All provided examples or code snippet may not fully work. However they are conceptionally correct and should point in the right direction. |
Each element in the Info Panel is defined by an InfoPanelItem object.
All available InfoPanelItem objects are sorted by the order.
This allows to arrange the items in a custom order.
After the elements are ordered, they are put below the SearchBox and the Vertices in Focus list.
3.1.1. Programmatic
It is possible to add items to the Info Panel in the Topology UI by simply implementing the interface InfoPanelItemProvider and expose its implementation via OSGi.
public class ExampleInfoPanelItemProvider implements InfoPanelItemProvider {
    @Override
    public Collection<? extends InfoPanelItem> getContributions(GraphContainer container) {
        return Collections.singleton(
                new DefaultInfoPanelItem() (1)
                    .withTitle("Static information") (2)
                    .withOrder(0) (3)
                    .withComponent(
                        new com.vaadin.ui.Label("I am a static component") (4)
                    )
        );
    }
}| 1 | The default implementation of InfoPanelItem.
You may use InfoPanelItem instead if the default implementation is not sufficient. |
| 2 | The title of the InfoPanelItem.
It is shown above the component. |
| 3 | The order. |
| 4 | A Vaadin component which actually describes the custom component. |
In order to show information based on a selected vertex or edge, one must inherit the classes EdgeInfoPanelItemProvider or VertexInfoPanelItemProvider.
The following example shows a custom EdgeInfoPanelItemProvider.
public class ExampleEdgeInfoPanelItemProvider extends EdgeInfoPanelItemProvider {
    @Override
    protected boolean contributeTo(EdgeRef ref, GraphContainer graphContainer) { (1)
        return "custom-namespace".equals(ref.getNamespace()); // only show if of certain namespace
    }

    @Override
    protected InfoPanelItem createInfoPanelItem(EdgeRef ref, GraphContainer graphContainer) { (2)
        return new DefaultInfoPanelItem()
                .withTitle(ref.getLabel() + " Info")
                .withOrder(0)
                .withComponent(
                        new com.vaadin.ui.Label("Id: " + ref.getId() + ", Namespace: " + ref.getNamespace())
                );
    }
}| 1 | Is invoked if one and only one edge is selected. It determines if the current edge should provide the InfoPanelItem created by createInfoPanelItem. |
| 2 | Is invoked if one and only one edge is selected. It creates the InfoPanelItem to show for the selected edge. |
Implementing the provided interfaces/classes, is not enough to have it show up.
It must also be exposed via a blueprint.xml to the OSGi service registry.
The following blueprint.xml snippet describes how to expose any custom InfoPanelItemProvider implementation to the OSGi service registry and have the Topology UI pick it up.
<service interface="org.opennms.features.topology.api.info.InfoPanelItemProvider"> (1)
    <bean class="ExampleInfoPanelItemProvider" /> (2)
</service>| 1 | The service definition must always point to InfoPanelItemProvider. |
| 2 | The bean implementing the defined interface. |
3.1.2. Scriptable
By simply dropping JinJava templates (with file extension .html) to $OPENNMS_HOME/etc/infopanel a more scriptable approach is available.
For more information on JinJava refer to https://github.com/HubSpot/jinjava.
The following example describes a very simple JinJava template which is always visible.
{% set visible = true %}  (1)
{% set title = "Static information" %} (2)
{% set order = -700 %} (3)

This information is always visible (4)| 1 | Makes this always visible |
| 2 | Defines the title |
| 3 | Each info panel item is ordered at the end. Making it -700 makes it very likely to pin this to the top of the info panel item. |
A template showing custom information may look as following:
{% set visible = vertex != null && vertex.namespace == "custom" && vertex.customProperty is defined %} (1)
{% set title = "Custom Information" %}

<table width="100%" border="0">
    <tr>
        <td colspan="3">This information is only visible if a vertex with namespace "custom" is selected</td>
    </tr>
    <tr>
        <td align="right" width="80">Custom Property</td>
        <td width="14"></td>
        <td align="left">{{ vertex.customProperty }}</td>
    </tr>
</table>| 1 | This template is only shown if a vertex is selected and the selected namespace is "custom". |
It is also possible to show performance data.
One can include resource graphs into the info panel by using the following HTML element:
<div class="graph-container" data-resource-id="RESOURCE_ID" data-graph-name="GRAPH_NAME"></div>Optional attributes data-graph-start and data-graph-end can be used to specify the displayed time range in seconds since epoch.
{# Example template for a simple memory statistic provided by the netsnmp agent #}
{% set visible = node != null && node.sysObjectId == ".1.3.6.1.4.1.8072.3.2.10" %}
{% set order = 110 %}
{# Setting the title #}
{% set title = "System Memory" %}
{# Define resource Id to be used #}
{% set resourceId = "node[" + node.id + "].nodeSnmp[]" %}
{# Define attribute Id to be used #}
{% set attributeId = "hrSystemUptime" %}
{% set total = measurements.getLastValue(resourceId, "memTotalReal")/1000/1024 %}
{% set avail = measurements.getLastValue(resourceId, "memAvailReal")/1000/1024 %}
<table border="0" width="100%">
<tr>
<td width="80" align="right" valign="top">Total</td>
<td width="14"></td>
<td align="left" valign="top" colspan="2">
{{ total|round(2) }} GB(s)
</td>
</tr>
<tr>
<td width="80" align="right" valign="top">Used</td>
<td width="14"></td>
<td align="left" valign="top" colspan="2">
{{ (total-avail)|round(2) }} GB(s)
</td>
</tr>
<tr>
<td width="80" align="right" valign="top">Available</td>
<td width="14"></td>
<td align="left" valign="top" colspan="2">
{{ avail|round(2) }} GB(s)
</td>
</tr>
<tr>
<td width="80" align="right" valign="top">Usage</td>
<td width="14"></td>
<td align="left" valign="top">
<meter style="width:100%" min="0" max="{{ total }}" low="{{ 0.5*total }}" high="{{ 0.8*total }}" value="{{ total-avail }}" optimum="0"/>
</td>
<td width="1">
{{ ((total-avail)/total*100)|round(2) }}%
</td>
</tr>
</table>{# Example template for the system uptime provided by the netsnmp agent #}
{% set visible = node != null && node.sysObjectId == ".1.3.6.1.4.1.8072.3.2.10" %}
{% set order = 100 %}
{# Setting the title #}
{% set title = "System Uptime" %}
{# Define resource Id to be used #}
{% set resourceId = "node[" + node.id + "].nodeSnmp[]" %}
{# Define attribute Id to be used #}
{% set attributeId = "hrSystemUptime" %}
<table border="0" width="100%">
<tr>
<td width="80" align="right" valign="top">getLastValue()</td>
<td width="14"></td>
<td align="left" valign="top">
{# Querying the last value via the getLastValue() method: #}
{% set last = measurements.getLastValue(resourceId, attributeId)/100.0/60.0/60.0/24.0 %}
{{ last|round(2) }} day(s)
</td>
</tr>
<tr>
<td width="80" align="right" valign="top">query()</td>
<td width="14"></td>
<td align="left" valign="top">
{# Querying the last value via the query() method. A custom function 'currentTimeMillis()' in
the namespace 'System' is used to get the timestamps for the query: #}
{% set end = System:currentTimeMillis() %}
{% set start = end - (15 * 60 * 1000) %}
{% set values = measurements.query(resourceId, attributeId, start, end, 300000, "AVERAGE") %}
{# Iterating over the values in reverse order and grab the first value which is not NaN #}
{% set last = "NaN" %}
{% for value in values|reverse %}
{%- if value != "NaN" && last == "NaN" %}
{{ (value/100.0/60.0/60.0/24.0)|round(2) }} day(s)
{% set last = value %}
{% endif %}
{%- endfor %}
</td>
</tr>
<tr>
<td width="80" align="right" valign="top">Graph</td>
<td width="14"></td>
<td align="left" valign="top">
{# We use the start and end variable here to construct the graph's Url: #}
<img src="/opennms/graph/graph.png?resourceId=node[{{ node.id }}].nodeSnmp[]&report=netsnmp.hrSystemUptime&start={{ start }}&end={{ end }}&width=170&height=30"/>
</td>
</tr>
</table>3.2. GraphML
In OpenNMS Horizon the GraphMLTopoloyProvider uses GraphML formatted files to visualize graphs.
GraphML is a comprehensive and easy-to-use file format for graphs. It consists of a language core to describe the structural properties of a graph and a flexible extension mechanism to add application-specific data. […] Unlike many other file formats for graphs, GraphML does not use a custom syntax. Instead, it is based on XML and hence ideally suited as a common denominator for all kinds of services generating, archiving, or processing graphs.
OpenNMS Horizon does not support the full feature set of GraphML. The following features are not supported: Nested graphs, Hyperedges, Ports and Extensions. For more information about GraphML refer to the Official Documentation.
A basic graph definition using GraphML usually consists of the following GraphML elements:
-
Graph element to describe the graph
-
Key elements to define custom properties, each element in the GraphML document can define as data elements
-
Node and Edge elements
-
Data elements to define custom properties, which OpenNMS Horizon will then interpret.
A very minimalistic example is given below:
<?xml version="1.0" encoding="UTF-8"?>
<graphml xmlns="http://graphml.graphdrawing.org/xmlns"
         xmlns:xsi="http://www.w3.org/2001/XMLSchema-instance"
         xsi:schemaLocation="http://graphml.graphdrawing.org/xmlns
     http://graphml.graphdrawing.org/xmlns/1.0/graphml.xsd">
     <!-- key section -->
    <key id="label" for="all" attr.name="label" attr.type="string"></key>
    <key id="namespace" for="graph" attr.name="namespace" attr.type="string"></key>

    <!-- shows up in the menu -->
    <data key="label">Minimalistic GraphML Topology Provider</data> (1)
    <graph id="minicmalistic"> (2)
        <data key="namespace">minimalistic</data> (3)
        <node id="node1"/> (4)
        <node id="node2"/>
        <node id="node3"/>
        <node id="node4"/>
    </graph>
</graphml>| 1 | The optional label of the menu entry. |
| 2 | The graph definition. |
| 3 | Each graph must have a namespace, otherwise OpenNMS Horizon refuses to load the graph. |
| 4 | Node definitions. |
3.2.1. Create/Update/Delete GraphML Topology
In order to create a GraphML Topology, a valid GraphML xml file must exist. Afterwards this is send to the OpenNMS Horizon REST API to create it:
curl -X POST -H "Content-Type: application/xml" -u admin:admin -d@graph.xml 'http://localhost:8980/opennms/rest/graphml/topology-name'The topology-name is a unique identifier for the Topology.
If a label property is defined for the Graphml element this is used to be displayed in the Topology UI, otherwise the topology-name defined here is used as a fallback.
To delete an already existing Topology a HTTP DELETE request must be send:
curl -X DELETE -u admin:admin 'http://localhost:8980/opennms/rest/graphml/topology-name'There is no PUT method available. In order to update an existing GraphML Topology one must first delete and afterwards re-create it.
Even if the HTTP Request was successful, it does not mean, that the Topology is actually loaded properly.
The HTTP Request states that the Graph was successfully received, persisted and is in a valid GraphML format.
However, the underlying GraphMLTopologyProvider may perform additional checks or encounters problems while parsing the file.
If the Topology does not show up, the karaf.log should be checked for any clues what went wrong.
In addition it may take a while before the Topology is actually selectable from the Topology UI.
|
3.2.2. Supported Attributes
A various set of GraphML attributes are supported and interpreted by OpenNMS Horizon while reading the GraphML file. The following table explains the supported attributes and for which GraphML elements they may be used.
The type of the GraphML-Attribute can be either boolean, int, long, float, double, or string. These types are defined like the corresponding types in the Java™-Programming language.
| Property | Required | For element | Type | Default | Description |
|---|---|---|---|---|---|
|
yes |
Graph |
|
- |
The namespace must be unique overall existing Topologies. |
|
no |
Graph |
|
- |
A description, which is shown in the Info Panel. |
|
no |
Graph |
|
|
Defines a preferred layout. |
|
no |
Graph |
|
|
Defines a focus strategy. See Focus Strategies for more information. |
|
no |
Graph |
|
- |
Refers to nodes ids in the graph.
This is required if |
|
no |
Graph |
|
|
Defines the default SZL. |
|
no |
Graph |
|
- |
Defines which Vertex Status Provider should be used, e.g. |
|
no |
Node |
|
|
Defines the icon. See Icons for more information. |
|
no |
Graph, Node |
|
- |
Defines a custom label. If not defined, the |
|
no |
Node |
|
- |
Allows referencing the Vertex to an OpenNMS node. |
|
no |
Node |
|
- |
Allows referencing the Vertex to an OpenNMS node identified by foreign source and foreign id.
Can only be used in combination with |
|
no |
Node |
|
- |
Allows referencing the Vertex to an OpenNMS node identified by foreign source and foreign id.
Can only be used in combination with |
|
no |
Node, Edge |
|
Defines a custom tooltip. If not defined, the |
|
|
no |
Node |
|
|
Sets the level of the Vertex which is used by certain layout algorithms i.e. |
|
no |
Graph, Node |
|
|
Controls the spacing between the paths drawn for the edges when there are multiple edges connecting two vertices. |
|
no |
GraphML |
|
|
Defines the breadcrumb strategy to use. See Breadcrumbs for more information. |
3.2.3. Focus Strategies
A Focus Strategy defines which Vertices should be added to focus when selecting the Topology.
The following strategies are available:
-
EMPTY No Vertex is add to focus.
-
ALL All Vertices are add to focus.
-
FIRST The first Vertex is add to focus.
-
SPECIFIC Only Vertices which id match the graph’s property
focus-idsare added to focus.
3.2.4. Icons
With the GraphMLTopoloygProvider it is not possible to change the icon from the Topology UI.
Instead if a custom icon should be used, each node must contain a iconKey property referencing an SVG element.
3.2.5. Vertex Status Provider
The Vertex Status Provider calculates the status of the Vertex.
There are multiple implementations available which can be configured for each graph: default, script and propagate.
If none is specified, there is no status provided at all.
Default Vertex Status Provider
The default status provider calculates the status based on the worst unacknowledged alarm associated with the Vertex’s node.
In order to have a status calculated a (OpenNMS Horizon) node must be associated with the Vertex.
This can be achieved by setting the GraphML attribute nodeID on the GraphML node accordingly.
Script Vertex Status Provider
The script status provider uses scripts similar to the Edge Status Provider.
Just place Groovy scripts (with file extension .groovy) in the directory $OPENNMS_HOME/etc/graphml-vertex-status.
All of the scripts will be evaluated and the most severe status will be used for the vertex in the topology’s visualization.
If the script shouldn’t contribute any status to a vertex just return null.
Propagate Vertex Status Provider
The propagate status provider follows all links from a node to its connected nodes.
It uses the status of these nodes to calculate the status by determining the worst one.
3.2.6. Edge Status Provider
It is also possible to compute a status for each edge in a given graph.
Just place Groovy scripts (with file extension .groovy) in the directory $OPENNMS_HOME/etc/graphml-edge-status.
All of the scripts will be evaluated and the most severe status will be used for the edge in the topology’s visualization.
The following simple Groovy script example will apply a different style and severity if the edge’s associated source node is down.
import org.opennms.netmgt.model.OnmsSeverity;
import org.opennms.features.topology.plugins.topo.graphml.GraphMLEdgeStatus;

if ( sourceNode != null && sourceNode.isDown() ) {
    return new GraphMLEdgeStatus(OnmsSeverity.WARNING, [ 'stroke-dasharray' : '5,5', 'stroke' : 'yellow', 'stroke-width' : '6' ]);
} else {
    return new GraphMLEdgeStatus(OnmsSeverity.NORMAL, []);
}
If the script shouldn’t contribute any status to an edge just return null.
3.2.7. Layers
The GraphMLTopologyProvider can handle GraphML files with multiple graphs. Each Graph is represented as a Layer in the Topology UI. If a vertex from one graph has an edge pointing to another graph, one can navigate to that layer.
<?xml version="1.0" encoding="UTF-8"?>
<graphml xmlns="http://graphml.graphdrawing.org/xmlns"
         xmlns:xsi="http://www.w3.org/2001/XMLSchema-instance"
         xsi:schemaLocation="http://graphml.graphdrawing.org/xmlns
     http://graphml.graphdrawing.org/xmlns/1.0/graphml.xsd">
    <!-- Key section -->
    <key id="label" for="graphml" attr.name="label" attr.type="string"></key>
    <key id="label" for="graph" attr.name="label" attr.type="string"></key>
    <key id="label" for="node" attr.name="label" attr.type="string"></key>
    <key id="description" for="graph" attr.name="description" attr.type="string"></key>
    <key id="namespace" for="graph" attr.name="namespace" attr.type="string"></key>
    <key id="preferred-layout" for="graph" attr.name="preferred-layout" attr.type="string"></key>
    <key id="focus-strategy" for="graph" attr.name="focus-strategy" attr.type="string"></key>
    <key id="focus-ids" for="graph" attr.name="focus-ids" attr.type="string"></key>
    <key id="semantic-zoom-level" for="graph" attr.name="semantic-zoom-level" attr.type="int"/>

    <!-- Label for Topology Selection menu -->
    <data key="label">Layer Example</data>
    <graph id="regions">
        <data key="namespace">acme:regions</data>
        <data key="label">Regions</data>
        <data key="description">The Regions Layer.</data>
        <data key="preferred-layout">Circle Layout</data>
        <data key="focus-strategy">ALL</data>
        <node id="north">
            <data key="label">North</data>
        </node>
        <node id="west">
            <data key="label">West</data>
        </node>
        <node id="south">
            <data key="label">South</data>
        </node>
        <node id="east">
            <data key="label">East</data>
        </node>
    </graph>
    <graph id="markets">
        <data key="namespace">acme:markets</data>
        <data key="description">The Markets Layer.</data>
        <data key="label">Markets</data>
        <data key="description">The Markets Layer</data>
        <data key="semantic-zoom-level">1</data>
        <data key="focus-strategy">SPECIFIC</data>
        <data key="focus-ids">north.2</data>
        <node id="north.1">
            <data key="label">North 1</data>
        </node>
        <node id="north.2">
            <data key="label">North 2</data>
        </node>
        <node id="north.3">
            <data key="label">North 3</data>
        </node>
        <node id="north.4">
            <data key="label">North 4</data>
        </node>
        <node id="west.1">
            <data key="label">West 1</data>
        </node>
        <node id="west.2">
            <data key="label">West 2</data>
        </node>
        <node id="west.3">
            <data key="label">West 3</data>
        </node>
        <node id="west.4">
            <data key="label">West 4</data>
        </node>
        <node id="south.1">
            <data key="label">South 1</data>
        </node>
        <node id="south.2">
            <data key="label">South 2</data>
        </node>
        <node id="south.3">
            <data key="label">South 3</data>
        </node>
        <node id="south.4">
            <data key="label">South 4</data>
        </node>
        <node id="east.1">
            <data key="label">East 1</data>
        </node>
        <node id="east.2">
            <data key="label">East 2</data>
        </node>
        <node id="east.3">
            <data key="label">East 3</data>
        </node>
        <node id="east.4">
            <data key="label">East 4</data>
        </node>
        <!-- Edges in this layer -->
        <edge id="north.1_north.2" source="north.1" target="north.2"/>
        <edge id="north.2_north.3" source="north.2" target="north.3"/>
        <edge id="north.3_north.4" source="north.3" target="north.4"/>
        <edge id="east.1_east.2" source="east.1" target="east.2"/>
        <edge id="east.2_east.3" source="east.2" target="east.3"/>
        <edge id="east.3_east.4" source="east.3" target="east.4"/>
        <edge id="south.1_south.2" source="south.1" target="south.2"/>
        <edge id="south.2_south.3" source="south.2" target="south.3"/>
        <edge id="south.3_south.4" source="south.3" target="south.4"/>
        <edge id="north.1_north.2" source="north.1" target="north.2"/>
        <edge id="north.2_north.3" source="north.2" target="north.3"/>
        <edge id="north.3_north.4" source="north.3" target="north.4"/>

        <!-- Edges to different layers -->
        <edge id="west_north.1" source="north" target="north.1"/>
        <edge id="north_north.2" source="north" target="north.2"/>
        <edge id="north_north.3" source="north" target="north.3"/>
        <edge id="north_north.4" source="north" target="north.4"/>
        <edge id="south_south.1" source="south" target="south.1"/>
        <edge id="south_south.2" source="south" target="south.2"/>
        <edge id="south_south.3" source="south" target="south.3"/>
        <edge id="south_south.4" source="south" target="south.4"/>
        <edge id="east_east.1" source="east" target="east.1"/>
        <edge id="east_east.2" source="east" target="east.2"/>
        <edge id="east_east.3" source="east" target="east.3"/>
        <edge id="east_east.4" source="east" target="east.4"/>
        <edge id="west_west.1" source="west" target="west.1"/>
        <edge id="west_west.2" source="west" target="west.2"/>
        <edge id="west_west.3" source="west" target="west.3"/>
        <edge id="west_west.4" source="west" target="west.4"/>
    </graph>
</graphml>
3.2.8. Breadcrumbs
When multiple Layers are used it is possible to navigate between them (navigate to option from vertex' context menu).
To give the user some orientation breadcrumbs can be enabled with the breadcrumb-strategy property.
The following strategies are supported:
-
NONE No breadcrumbs are shown.
-
SHORTEST_PATH_TO_ROOT generates breadcrumbs from all visible vertices to the root layer (TopologyProvider). The algorithms assumes a hierarchical graph. Be aware, that all vertices MUST share the same root layer, otherwise the algorithm to determine the path to root does not work.
The following figure visualizes a graphml defining multiple layers (see below for the graphml definition).
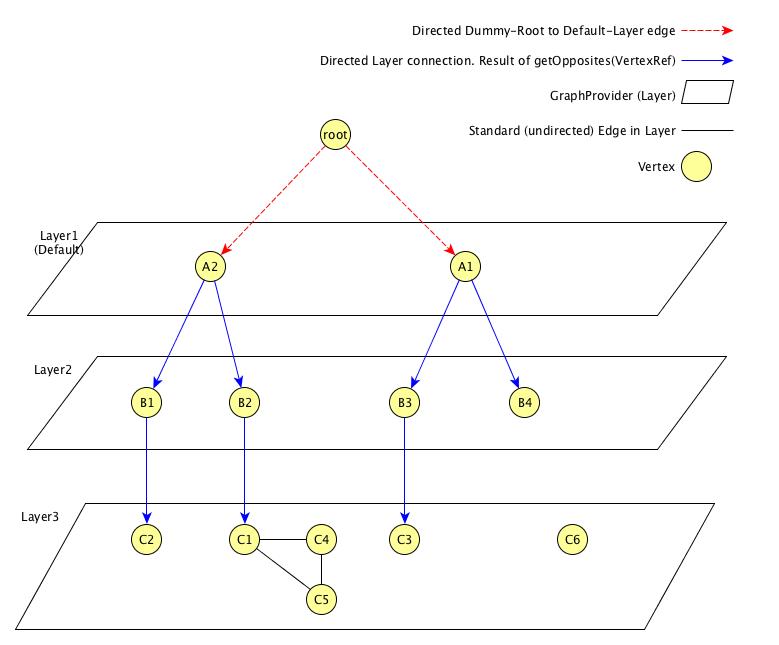
From the given example, the user can select the Breadcrumb Example Topology Provider from the menu.
The user can switch between Layer 1, Layer 2 and Layer 3.
In addition for each vertex which has connections to another layer, the user can select the navigate to option from the context menu of that vertex to navigate to the according layer.
The user can also search for all vertices and add it to focus.
The following behaviour is implemented:
-
If a user navigates from one vertex to a vertex in another layer, the view is switched to that layer and adds all vertices to focus, the
source vertexpointed to. The Breadcrumb is<parent layer name> > <source vertex>. For example, if a user navigates fromLayer1:A2toLayer2:B1the view switches toLayer 2and addsB1andB2to focus. In additionLayer 1 > A2is shown as Breadcrumbs. -
If a user directly switches to another layer, the default focus strategy is applied, which may result in multiple vertices with no unique parent. The calculated breadcrumb is:
<parent layer name> > Multiple <target layer name>. For example, if a user switches toLayer 3, all vertices of that layer are added to focus (focus-strategy=ALL). No unique path to root is found, the following breadcrumb is shown instead:Layer 1 > Multiple Layer 1>Multiple Layer 2 -
If a user adds a vertex to focus, which is not in the current selected layer, the view switches to that layer and only the "new" vertex is added to focus. The generated breadcrumb shows the path to root through all layers. For example, the user adds
C3to focus, and the current layer isLayer 1, than the generated breadcrumb is as follows:Layer 1 > A1 > B3. -
Only elements between layers are shown in the breadcrumb. Connections on the same layer are ignored. For example, a user adds
C5to focus, the generated breadcrumb is as follows:Layer 1 > A2 > B2
The following graphml file defines the above shown graph. Be aware, that the root vertex shown above is generated to help calculating the path to root. It must not be defined in the graphml document.
<?xml version="1.0" encoding="UTF-8"?>
<graphml xmlns="http://graphml.graphdrawing.org/xmlns"
         xmlns:xsi="http://www.w3.org/2001/XMLSchema-instance"
         xsi:schemaLocation="http://graphml.graphdrawing.org/xmlns
     http://graphml.graphdrawing.org/xmlns/1.0/graphml.xsd">
    <key id="breadcrumb-strategy" for="graphml" attr.name="breadcrumb-strategy" attr.type="string"></key>
    <key id="label" for="all" attr.name="label" attr.type="string"></key>
    <key id="description" for="graph" attr.name="description" attr.type="string"></key>
    <key id="namespace" for="graph" attr.name="namespace" attr.type="string"></key>
    <key id="focus-strategy" for="graph" attr.name="focus-strategy" attr.type="string"></key>
    <key id="focus-ids" for="graph" attr.name="focus-ids" attr.type="string"></key>
    <key id="preferred-layout" for="graph" attr.name="preferred-layout" attr.type="string"></key>
    <key id="semantic-zoom-level" for="graph" attr.name="semantic-zoom-level" attr.type="int"/>
    <data key="label">Breadcrumb Example</data>
    <data key="breadcrumb-strategy">SHORTEST_PATH_TO_ROOT</data>
    <graph id="L1">
        <data key="label">Layer 1</data>
        <data key="namespace">acme:layer1</data>
        <data key="focus-strategy">ALL</data>
        <data key="preferred-layout">Circle Layout</data>
        <node id="a1">
            <data key="label">A1</data>
        </node>
        <node id="a2">
            <data key="label">A2</data>
        </node>
        <edge id="a1_b3" source="a1" target="b3"/>
        <edge id="a1_b4" source="a1" target="b4"/>
        <edge id="a2_b1" source="a2" target="b1"/>
        <edge id="a2_b2" source="a2" target="b2"/>
    </graph>
    <graph id="L2">
        <data key="label">Layer 2</data>
        <data key="focus-strategy">ALL</data>
        <data key="namespace">acme:layer2</data>
        <data key="preferred-layout">Circle Layout</data>
        <data key="semantic-zoom-level">0</data>
        <node id="b1">
            <data key="label">B1</data>
        </node>
        <node id="b2">
            <data key="label">B2</data>
        </node>
        <node id="b3">
            <data key="label">B3</data>
        </node>
        <node id="b4">
            <data key="label">B4</data>
        </node>
        <edge id="b1_c2" source="b1" target="c2"/>
        <edge id="b2_c1" source="b2" target="c1"/>
        <edge id="b3_c3" source="b3" target="c3"/>
    </graph>
    <graph id="Layer 3">
        <data key="label">Layer 3</data>
        <data key="focus-strategy">ALL</data>
        <data key="description">Layer 3</data>
        <data key="namespace">acme:layer3</data>
        <data key="preferred-layout">Grid Layout</data>
        <data key="semantic-zoom-level">1</data>
        <node id="c1">
            <data key="label">C1</data>
        </node>
        <node id="c2">
            <data key="label">C2</data>
        </node>
        <node id="c3">
            <data key="label">C3</data>
        </node>
        <node id="c4">
            <data key="label">C4</data>
        </node>
        <node id="c5">
            <data key="label">C5</data>
        </node>
        <node id="c6">
            <data key="label">C6</data>
        </node>
        <edge id="c1_c4" source="c1" target="c4"/>
        <edge id="c1_c5" source="c1" target="c5"/>
        <edge id="c4_c5" source="c4" target="c5"/>
    </graph>
</graphml>
4. CORS Support
4.1. 为什么需要 CORS 支持?
默认情况下,许多浏览器实现了一个 same origin policy 策略,防止不同源的资源请求。
例如,源于 http://www.opennms.org 的请求页面包含了 http://www.adventuresinoss.com 上的一个资源,被认为是跨源请求。
CORS (跨源资源共享) 是用于启用跨源请求的标准机制。
有关进一步细节,请参加:
4.2. 如何启用 CORS 支持?
对 REST 接口 (或其它 Web UI 部分) 启用 CORS 支持需要如下步骤:
-
打开 '$OPENNMS_HOME/jetty-webapps/opennms/WEB-INF/web.xml' 进行编辑。
-
删除 <filter-mapping> 的注释,将 CORS 过滤器应用到 '/rest/' 路径。 修改结果例如:
  <!-- Uncomment this to enable CORS support -->
  <filter-mapping>
    <filter-name>CORS Filter</filter-name>
    <url-pattern>/rest/*</url-pattern>
  </filter-mapping>
-
重新启动 OpenNMS Horizon
4.3. 如何配置 CORS 支持?
CORS 通过提供的 org.ebaysf.web.cors.CORSFilter servlet 过滤器获得支持。
可以通过修改上面引用的过滤器定义来配置参数,定义在 'web.xml' 文件中。
默认情况下,允许的源参数设置是 '*'。
支持的完成参数列表参考:
5. ReST API
RESTful 接口是一个符合 REST 架构风格的 web 服务,正如书中描述 RESTful Web Services。 这个页面描述了 OpenNMS Horizon 的 RESTful 接口。
5.1. ReST URL
调用 Rest 的基础 URL 是: http://opennmsserver:8980/opennms/rest/
例如,http://localhost:8980/opennms/rest/alarms/ 将提供系统中的当前告警。
5.2. 认证
使用 HTTP 基本身份认证的有效用户名和密码。 默认情况下,你不会收的认证失败信息,因此必须配置你的 ReST 客户端库主动发送基本身份认证信息。
5.3. 数据格式
Jersey 允许使用 XML 或 JSON 进行 ReST 调用。
默认以 XML 返回 API 的请求。
要获得 JSON 编码的响应,必须发送 header 为: Accept: application/json 的请求。
5.4. 标准参数
以下是大多数资源上可用的标准参数 (如下所示)
| 参数 | 描述 |
|---|---|
|
整数,限制结果的数量。这对事件和通知尤其有用,例如意外调用了没有限制的请求,返回成千上万的结果可能杀死客户端或服务器。如果设置为 0,则不加限制。 |
|
整数,是返回结果集的偏移量。例如,如果有100条记录,偏移量是15,并且限制为10,则将返回条目15至24。用于分页。 |
过滤: 被访问实体的所有属性可以被指定为 URL (对于 GET) 或 表单值 (对于 PUT 和 POST) 的参数。像这样可以添加结果过滤器。默认情况下,使用 相等 操作,除非使用 |
|
|
相等 |
|
不相等 |
|
不区分大小写的通配符 ( |
|
区分大小写的通配符 ( |
|
大于 |
|
小于 |
|
大于或等于 |
|
小于或等于 |
如果给定属性传递 null 值,那么是明确操作 (该属性比较器将忽略)。
notnull 处理类似。
-
排序: 如果指定了
orderBy参数,结果将根据该属性排序。 默认为升序,除非指定order参数为desc(任何其他值将默认为升序)
5.5. 标准过滤器实例
以 /events 为例。
| 资源 | 描述 |
|---|---|
|
将返回前10条 rtc subscribe UEI 的事件, (10 是事件的默认限制) |
|
将返回 所有 的 rtc subscribe 事件 (可能相当多) |
|
将返回 ID 大于 100 的前10条事件 |
|
将返回确认时间非空的前10条事件 (即,已确认的事件) |
|
将返回确认时间非空并且 ID 大于 100 的前20条事件。注意,notnull 值将导致比较器忽略 eventAckTime |
|
将返回在 2008年7月28日 上午4:44 (+12:00) 之后确认并且 ID 大于 100 的前20条事件。注意,相同的比较器应用于两个属性比较。还要注意,使用 GET 时,必须对加号进行 URL编码。 |
|
将返回插入的10条最新事件 (可能的,除非你弄乱了ID) |
|
将返回 'MINION' 地点的设备相关的前10条事件 |
5.6. HTTP 返回码
下面适用于 OpenNMS Horizon 18 及更新版本。
-
所有 DELETE 请求成功将返回 204 (NO_CONTENT)。
-
所有 PUT 请求成功将返回 204 (NO_CONTENT)。
-
所有添加或更新实体的 POST 请求成功将返回 204 (NO_CONTENT)。
-
所有相关资源添加的 POST 请求成功将返回 201 (CREATED)。
-
所有返回一个对象的 POST 请求将返回 200 (OK)。
-
除了 申请单和外部源定义 两个之外的所有请都返回 202 (ACCEPTED)。这是因为所有请求实际上都是异步执行的,没办法知道执行状态,或等待处理完成。
-
如果在 PUT 请求期间资源没有修改,将返回 NOT_MODIFIED。成功的情况会返回 NO_CONTENT。
-
所有的成功请求将返回 200 (OK)。
-
对于所有 GET 请求,当一个资源不存在时,就会返回 404 (NOT_FOUND),但是如果中间资源不存在,则返回 400 (BAD_REQUEST)。例如,如果设备上不存在指定的IP,则返回404。但是如果IP有效而设备无效,因为设备是中间资源,将返回400。
-
如果在处理 HTTP 请求时,从 Service/DAO 层接收到不希望的信息,如异常,将返回 500 (INTERNAL_SERVER_ERROR)。
-
任何传入参数的相关问题,如无效,将产生 400 (BAD_REQUEST)。
5.7. 资源标识
一些端点处理资源,使用 资源 IDs_ 标识。 由于每个资源的父节点基本都是设备,因此构造资源ID的第一步是标识设备资源。 标识设备的资源ID有两种样式:
| 样式 | 描述 | 例子 |
|---|---|---|
|
通过数据ID标识设备,ID是一个整数 |
|
|
通过其外部源名称和外源ID标识一个设备,由冒号连接 |
|
设备标识符后面跟一个句点(.),然后是资源类型名和实例名。 实例名称的特点可能根据资源类型不同而不同。 举几个例子:
| 值 | 描述 |
|---|---|
|
设备级 (标量) 设备的性能数据。 此类型是实例标识符为空的唯一类型。 |
|
由 SNMP |
|
运行 Net-SNMP 管理代理的设备的根文件系统。 |
这里有几个很好的资源ID示例:
-
node[1].nodeSnmp[] -
node[42].interfaceSnmp[eth0-04013f75f101] -
node[Servers:115da833-0957-4471-b496-a731928c27dd].dskIndex[_root_fs]
5.8. Expose ReST services via OSGi
In order to expose a ReST service via OSGi the following steps must be followed:
-
Define an interface, containing java jax-rs annotations
-
Define a class, implementing that interface
-
Create an OSGi bundle which exports a service with the interface from above
5.8.1. Define a ReST interface
At first a public interface must be created which must contain jax-rs annotations.
@Path("/datachoices") (1)
public interface DataChoiceRestService {

    @POST (2)
    void updateCollectUsageStatisticFlag(@Context HttpServletRequest request, @QueryParam("action") String action);

    @GET
    @Produces(value={MediaType.APPLICATION_JSON})
    UsageStatisticsReportDTO getUsageStatistics();
}| 1 | Each ReST interface must either have a @Path or @Provider annotation.
Otherwise it is not considered a ReST service. |
| 2 | Use jax-rs annotations, such as @Post, @GET, @PUT, @Path, etc. to define the ReST service. |
5.8.2. Implement a ReST interface
A class must implement the ReST interface.
| The class may or may not repeat the jax-rs annotations from the interface. This is purely for readability. Changing or adding different jax-rs annotations on the class, won’t have any effect. |
public class DataChoiceRestServiceImpl implements DataChoiceRestService {

    @Override
    public void updateCollectUsageStatisticFlag(HttpServletRequest request, String action) {
       // do something
    }

    @Override
    public UsageStatisticsReportDTO getUsageStatistics() {
       return null;
    }
}
5.8.3. Export the ReST service
At last the ReST service must be exported via the bundlecontext. This can be either achieved using an Activator or the blueprint mechanism.
<blueprint xmlns="http://www.osgi.org/xmlns/blueprint/v1.0.0"
           xmlns:xsi="http://www.w3.org/2001/XMLSchema-instance"
	       xsi:schemaLocation="
                http://www.osgi.org/xmlns/blueprint/v1.0.0
                http://www.osgi.org/xmlns/blueprint/v1.0.0/blueprint.xsd
">
    <bean id="dataChoiceRestService" class="org.opennms.features.datachoices.web.internal.DataChoiceRestServiceImpl" /> (1)
    <service interface="org.opennms.features.datachoices.web.DataChoiceRestService" ref="dataChoiceRestService" > (2)
        <service-properties>
            <entry key="application-path" value="/rest" /> (3)
        </service-properties>
    </service>

</blueprint>| 1 | Create the ReST implementation class |
| 2 | Export the ReST service |
| 3 | Define where the ReST service will be exported to, e.g. /rest, /api/v2, but also completely different paths can be used.
If not defined, /services is used. |
For a full working example refer to the datachoices feature.
5.9. Currently Implemented Interfaces
5.9.1. 确认
默认偏移量为 0,默认结果限制为 10。
要获得所有结果,使用 limit=0 作为 URL 上的参数 (例如,GET /acks?limit=0)。
|
GETs (读取数据)
| 资源 | 描述 |
|---|---|
|
获取确认列表。 |
|
获取确认的数量。 (返回明文,而不是 XML 或 JSON 格式。) |
|
获取给定 ID 的确认信息。 |
POSTs (设置数据)
| 资源 | 描述 |
|---|---|
|
创建或修改给定告警 ID 或通知 ID 的确认。为了表明是告警操作,要在 URL-encoded POST body 中设置一个 |
curl 使用示例
curl -u 'admin:admin' -X POST -d notifId=3 -d action=ack http://localhost:8980/opennms/rest/ackscurl -u 'admin:admin' -X POST -d alarmId=42 -d action=esc http://localhost:8980/opennms/rest/acks5.9.2. 告警统计
可以获取告警的一些基本统计数据,包括确认告警数量,总告警数,和最新或最早确认、未确认告警。
GETs (读取数据)
| 资源 | 描述 |
|---|---|
|
返回告警相关的统计数据。接受 Hibernate 参数,你可以用在 |
|
返回告警相关的统计数据,每种告警级别的统计。你可以指定 |
5.9.3. 告警
默认偏移量为 0,默认结果限制为 10。要获得所有结果,使用 limit=0 作为 URL 上的参数 (例如,GET /alarms?limit=0)。
|
GETs (读取数据)
| 资源 | 描述 |
|---|---|
|
获取告警列表。 |
|
获取告警数量。(返回明文,而不是 XML 或 JSON 格式。) |
|
获取给定 ID 的告警。 |
注意,你也可以根据告警级别来查询,例如:
| 资源 | 描述 |
|---|---|
|
获取告警级别大于或等于 MINOR 的告警。 |
PUTs (修改数据)
PUT 需要的表单数据使用 application/x-www-form-urlencoded 作为 Content-Type。
| 资源 | 描述 |
|---|---|
|
确认 (或取消确认) 告警。 |
|
确认 (或取消确认) 告警,并匹配附加查询参数。例如, |
OpenNMS 1.11.0 版本新特性
在 OpenNMS 1.11.0 中,在告警确认 API 中支持一些附加的特性:
| 资源 | 描述 |
|---|---|
|
清除告警 |
|
升级告警。例如,NORMAL → MINOR,MAJOR → CRITICAL,等。 |
|
清除与附加查询参数匹配的告警。 |
|
升级与附加查询参数匹配的告警。 |
另外,当确认告警时 (ack=true),你可以指定一个 ackUser 参数。
如果你是一个管理员 admin 角色身份的用户,将允许你进行 ack 操作,作为一个不同的用户。
5.9.4. 事件
GETs (读取数据)
| 资源 | 描述 |
|---|---|
|
获取事件列表。默认偏移量为 0,默认结果限制为 10。要获得所有结果,使用 |
|
获取事件的数量。 (返回明文,而不是 XML 或 JSON 格式。) |
|
获取给定 ID 的事件。 |
PUTs (修改数据)
PUT 需要的表单数据使用 application/x-www-form-urlencoded 作为 Content-Type。
| 资源 | 描述 |
|---|---|
|
确认 (或取消确认) 某一事件。 |
|
确认 (或取消确认) 匹配事件。 |
POSTs (添加数据)
POST 需要 XML (application/xml) 或 JSON (application/json) 作为 Content-Type。
请参考 ${OPENNMS_HOME}/share/xsds/event.xsd 设计架构。
|
| 资源 | 描述 |
|---|---|
|
将事件发布到事件总线。 |
5.9.5. 分类
GETs (读取数据)
| 资源 | 描述 |
|---|---|
|
获取所有配置的分类。 |
|
获取给定名称的分类。 |
|
获取给定设备和分类名称的分类 (类似于 |
|
获取给定设备的分类 (类似于 |
|
获取给定用户组的分类 (类似于 |
POSTs (添加数据)
| 资源 | 描述 |
|---|---|
|
添加新分类。 |
PUTs (修改数据)
| 资源 | 描述 |
|---|---|
|
更新指定分类。 |
|
使用给定设备ID和名称修改分类 (类似于 |
|
将给定的分类添加到指定的用户组 (类似于 |
DELETEs (删除数据)
| 资源 | 描述 |
|---|---|
|
删除指定分类 |
|
从给定设备上删除指定分类 (类似于 |
|
从给定用户组中删除指定分类 (类似于 |
5.9.6. Flow API
The Flow API can be used to retrieve summary statistics and time series data derived from persisted flows.
| Unless specific otherwise, all unit of time are expressed in milliseconds. |
GETs (Reading Data)
| Resource | Description |
|---|---|
|
Retrieve the number of flows available |
|
Retrieve basic information for the exporter nodes that have flows available |
|
Retrieve detailed information about a specific exporter node |
|
Retrieve traffic summary statistics for the top N applications |
|
Retrieve time series metrics for the top N applications |
|
Retrieve traffic summary statistics for the top N conversations |
|
Retrieve time series metrics for the top N conversations |
All of the endpoints support the following query string parameters to help filter the results:
The given filters are combined using a logical AND.
There is no support for using OR logic, or combinations thereof.
|
name |
default |
comment |
start |
-14400000 |
Timestamp in milliseconds. If > 0, the timestamp is relative to the UNIX epoch (January 1st 1970 00:00:00 AM). If < 0, the timestamp is relative to the |
end |
0 |
Timestamp in milliseconds. If <= 0, the effective value will be the current timestamp. |
ifIndex |
(none) |
Filter for flows that came in through the given SNMP interface. |
exporterNode |
(none) |
Filter for flows that came where exported by the given node. Support either node id (integer) i.e. 1, or foreign source and foreign id lookups i.e. FS:FID. |
The exporters endpoints do not support any parameters.
The applications endpoints also support:
| name | default | comment |
|---|---|---|
N |
10 |
Number of top entries (determined by total bytes transferred) to return |
includeOther |
false |
When set to |
The applications and conversations endpoints also support:
| name | default | comment |
|---|---|---|
N |
10 |
Number of top entries (determined by total bytes transferred) to return |
The series endpoints also support:
| name | default | comment |
|---|---|---|
step |
300000 |
Requested time interval between rows. |
Examples
curl -u admin:admin http://localhost:8980/opennms/rest/flows/count915curl -u admin:admin http://localhost:8980/opennms/rest/flows/applications{
"start": 1513788044417,
"end": 1513802444417,
"headers": ["Application", "Bytes In", "Bytes Out"],
"rows": [
["https", 48789, 136626],
["http", 12430, 5265]
]
}curl -u admin:admin http://localhost:8980/opennms/rest/flows/conversations{
"start": 1513788228224,
"end": 1513802628224,
"headers": ["Location", "Protocol", "Source IP", "Source Port", "Dest. IP", "Dest. Port", "Bytes In", "Bytes Out"],
"rows": [
["Default", 17, "10.0.2.15", 33816, "172.217.0.66", 443, 12166, 117297],
["Default", 17, "10.0.2.15", 32966, "172.217.0.70", 443, 5042, 107542],
["Default", 17, "10.0.2.15", 54087, "172.217.0.67", 443, 55393, 5781],
["Default", 17, "10.0.2.15", 58046, "172.217.0.70", 443, 4284, 46986],
["Default", 6, "10.0.2.15", 39300, "69.172.216.58", 80, 969, 48178],
["Default", 17, "10.0.2.15", 48691, "64.233.176.154", 443, 8187, 39847],
["Default", 17, "10.0.2.15", 39933, "172.217.0.65", 443, 1158, 33913],
["Default", 17, "10.0.2.15", 60751, "216.58.218.4", 443, 5504, 24957],
["Default", 17, "10.0.2.15", 51972, "172.217.0.65", 443, 2666, 22556],
["Default", 6, "10.0.2.15", 46644, "31.13.65.7", 443, 459, 16952]
]
}curl -u admin:admin http://localhost:8980/opennms/rest/flows/applications/series?N=3&includeOther=true&step=3600000{
"start": 1516292071742,
"end": 1516306471742,
"columns": [
{
"label": "domain",
"ingress": true
},
{
"label": "https",
"ingress": true
},
{
"label": "http",
"ingress": true
},
{
"label": "Other",
"ingress": true
}
],
"timestamps": [
1516291200000,
1516294800000,
1516298400000
],
"values": [
[9725, 12962, 9725],
[70665, 125044, 70585],
[10937,13141,10929],
[1976,2508,2615]
]
}curl -u admin:admin http://localhost:8980/opennms/rest/flows/conversations/series?N=3&step=3600000{
"start": 1516292150407,
"end": 1516306550407,
"columns": [
{
"label": "10.0.2.15:55056 <-> 152.19.134.142:443",
"ingress": false
},
{
"label": "10.0.2.15:55056 <-> 152.19.134.142:443",
"ingress": true
},
{
"label": "10.0.2.15:55058 <-> 152.19.134.142:443",
"ingress": false
},
{
"label": "10.0.2.15:55058 <-> 152.19.134.142:443",
"ingress": true
},
{
"label": "10.0.2.2:61470 <-> 10.0.2.15:8980",
"ingress": false
},
{
"label": "10.0.2.2:61470 <-> 10.0.2.15:8980",
"ingress": true
}
],
"timestamps": [
1516294800000,
1516298400000
],
"values": [
[17116,"NaN"],
[1426,"NaN"],
[20395,"NaN",
[1455,"NaN"],
["NaN",5917],
["NaN",2739]
]
}5.9.7. Flow Classification API
The Flow Classification API can be used to update, create or delete flow classification rules.
If not otherwise specified the Content-Type of the response is application/json.
|
GETs (Reading Data)
| Resource | Description |
|---|---|
|
Retrieve a list of all enabled rules.
The request is limited to |
|
Retrieve the rule identified by |
|
Retrieve all existing groups.
The request is limited to |
|
Retrieve the group identified by |
|
Retrieve all supported tcp protocols. |
The /classifications endpoint supports the following url parameters:
The given filters are combined using a logical AND.
There is no support for using OR logic, or combinations thereof.
|
| name | default |
|---|---|
comment |
groupFilter |
(none) |
The group to filter the rules by. Should be the |
query |
(none) |
Examples
curl -X GET -u admin:admin http://localhost:8980/opennms/rest/classifications[
{
    "group": {
        "description": "Classification rules defined by the user",
        "enabled": true,
        "id": 2,
        "name": "user-defined",
        "priority": 10,
        "readOnly": false,
        "ruleCount": 1
    },
    "id": 1,
    "ipAddress": null,
    "name": "http",
    "port": "80",
    "position": 0,
    "protocols": [
        "TCP"
    ]
}
]curl -X GET -u admin:admin http://localhost:8980/opennms/rest/classifications/groups[
{
    "description": "Classification rules defined by OpenNMS",
    "enabled": false,
    "id": 1,
    "name": "pre-defined",
    "priority": 0,
    "readOnly": true,
    "ruleCount": 6248
},
{
"description": "Classification rules defined by the user",
"enabled": true,
"id": 2,
"name": "user-defined",
"priority": 10,
"readOnly": false,
"ruleCount": 1
}
]curl -X GET -u admin:admin http://localhost:8980/opennms/rest/classifications/1{
"group": {
"description": "Classification rules defined by the user",
"enabled": true,
"id": 2,
"name": "user-defined",
"priority": 10,
"readOnly": false,
"ruleCount": 1
},
"id": 1,
"ipAddress": null,
"name": "http",
"port": "80",
"position": 0,
"protocols": [
"TCP"
]
}curl -X GET -H "Accept: application/json" -u admin:admin http://localhost:8980/opennms/rest/classifications/groups/1{
"description": "Classification rules defined by OpenNMS",
"enabled": false,
"id": 1,
"name": "pre-defined",
"priority": 0,
"readOnly": true,
"ruleCount": 6248
}curl -X GET -H "Accept: text/comma-separated-values" -u admin:admin http://localhost:8980/opennms/rest/classifications/groups/2name;ipAddress;port;protocol
http;;80;TCPPOSTs (Creating Data)
| Resource | Description |
|---|---|
|
Post a new rule or import rules from CSV. If multiple rules are imported (to user-defined group) from a CSV file all existing rules are deleted. |
|
Classify the given request based on all enabled rules. |
Examples
curl -X POST -H "Content-Type: application/json" -u admin:admin -d '{"name": "http", "port":"80,8080", "protocols":["tcp", "udp"]}' http://localhost:8980/opennms/rest/classificationsHTTP/1.1 201 Created
Date: Thu, 08 Feb 2018 14:44:27 GMT
Location: http://localhost:8980/opennms/rest/classifications/6616curl -X POST -H "Content-Type: application/json" -u admin:admin -d '{"protocol": "tcp", "ipAddress": "192.168.0.1", "port" :"80"}' http://localhost:8980/opennms/rest/classifications/classify{
"classification":"http"
}curl -X POST -H "Content-Type: application/json" -u admin:admin -d '{"protocol": "tcp", "ipAddress": "192.168.0.1", "port" :"8980"}' http://localhost:8980/opennms/rest/classifications/classifyHTTP/1.1 204 No Contentcurl -X POST -H "Content-Type: text/comma-separated-values" -u admin:admin -d $'name;ipAddress;port;protocol\nOpenNMS;;8980;tcp,udp\n' http://localhost:8980/opennms/rest/classifications\?hasHeader\=trueHTTP/1.1 204 No Contentcurl -X POST -H "Content-Type: text/comma-separated-values" -u admin:admin -d $'OpenNMS;;INCORRECT;tcp,udp\nhttp;;80,8080;ULF' http://localhost:8980/opennms/rest/classifications\?hasHeader\=false{
"errors": {
"1": {
"context": "port",
"key": "rule.port.definition.invalid",
"message": "Please provide a valid port definition. Allowed values are numbers between 0 and 65536. A range can be provided, e.g. \"4000-5000\", multiple values are allowed, e.g. \"80,8080\""
},
"2": {
"context": "protocol",
"key": "rule.protocol.doesnotexist",
"message": "The defined protocol 'ULF' does not exist"
}
},
"success": false
}PUTs (Updating Data)
| Resource | Description |
|---|---|
|
Update a rule identified by |
|
Retrieve the rule identified by |
|
Update a group. At the moment, only the enabled property can be changed |
DELETEs (Deleting Data)
| Resource | Description |
|---|---|
|
Deletes all rules of a given group. |
|
Delete the given group and all it’s containing rules. |
5.9.8. Foreign Sources (外部源)
OpenNMS Horizon 的 ReSTful 服务 Provisioning 外部源定义。外部源定义用于控制 SLA 监控的服务扫描 (服务探测),以及物理接口 (资源) 的数据采集设置。
这个 API 支持 CRUD 操作来管理 Provisioner 的外部源定义。外部源定义被 POSTed,并且当 Provisiond 导入/同步相应的申请单时,将被部署。
如果一个请求得到了 "active" 状态的外部源,那意味着它返回就绪的外部源 (被编辑部署),否则它将返回部署的外部源。
GETs (读取数据)
| 资源 | 描述 |
|---|---|
|
获取所有激活的外部源。 |
|
获取激活默认外部源。 |
|
获取所有已部署 (active) 外部源。 |
|
获取部署的外部源的数量。 (返回明文,而不是 XML 或 JSON 格式。) |
|
获取名为 {name} 的激活外部源。 |
|
获取外部源名为 {name} 的配置探测器。 |
|
获取名为 {name} 的外部源指定的探测器。 |
|
获取外部源名为 {name} 的配置策略。 |
|
获取外部源名为 {name} 的指定策略。 |
POSTs (添加数据)
POST 需要 XML (application/xml) 作为 Content-Type。
| 资源 | 描述 |
|---|---|
|
添加外部源。 |
|
向指定名称的外部源添加探测器。 |
|
向指定名称的外部源添加策略。 |
PUTs (修改数据)
PUT 需要的表单数据使用 application/x-www-form-urlencoded 作为 Content-Type。
| 资源 | 描述 |
|---|---|
|
修改给定名称的外部源。 |
DELETEs (删除数据)
| 资源 | 描述 |
|---|---|
|
删除给定名称的外部源。 |
|
从给定名称的外部源删除指定探测器。 |
|
从给定名称的外部源删除指定策略。 |
5.9.9. 用户组
和用户一样,用户组也有一个简单的接口。
GETs (读取数据)
| 资源 | 描述 |
|---|---|
|
获取组列表。 |
|
获取给定名称的用户组。 |
|
获取指定组的所有用户。(OpenNMS 14 版本新特性) |
|
给定组名称,获取与组关联的分类。 (OpenNMS 14 版本新特性) |
POSTs (添加数据)
| 资源 | 描述 |
|---|---|
|
添加一个新组。 |
PUTs (修改数据)
| 资源 | 描述 |
|---|---|
|
更新组的元数据 (例如,更改 |
|
给定组名和用户名,向组添加用户。 (OpenNMS 14 版本新特性) |
|
给定组名和分类名,将分类与组关联。 (OpenNMS 14 版本新特性) |
DELETEs (删除数据)
| 资源 | 描述 |
|---|---|
|
删除一个组。 |
|
从组中删除用户。 (OpenNMS 14 版本新特性) |
|
给定组名和分类名,将分类与组分离。 (OpenNMS 14 版本新特性) |
5.9.10. Heatmap
GETs (Reading Data)
| Resource | Description |
|---|---|
|
Sizes and color codes based on outages for nodes grouped by Surveillance Categories |
|
Sizes and color codes based on outages for nodes grouped by Foreign Source |
|
Sizes and color codes based on outages for nodes grouped by monitored services |
|
Sizes and color codes based on outages for nodes associated with a specific Surveillance Category |
|
Sizes and color codes based on outages for nodes associated with a specific Foreign Source |
|
Sizes and color codes based on outages for nodes providing a specific monitored service |
| Resource | Description |
|---|---|
|
Sizes and color codes based on alarms for nodes grouped by Surveillance Categories |
|
Sizes and color codes based on alarms for nodes grouped by Foreign Source |
|
Sizes and color codes based on alarms for nodes grouped by monitored services |
|
Sizes and color codes based on alarms for nodes associated with a specific Surveillance Category |
|
Sizes and color codes based on alarms for nodes associated with a specific Foreign Source |
|
Sizes and color codes based on alarms for nodes providing a specific monitored service |
5.9.11. 接口服务
基于给定的搜索规则获取或修改监控服务的状态,基于设备,IP接口,分类,或监控服务。
实例:
-
/ifservices?node.label=onms-prd-01
-
/ifservices?ipInterface.ipAddress=192.168.32.140
-
/ifservices?category.name=Production
-
/ifservices?status=A
GETs (读取数据)
| 资源 | 描述 |
|---|---|
|
获取给定搜索规则匹配的所有配置监控服务。 |
实例:
获取申请单名为 Servers 的设备强制未管理服务:
curl -u admin:admin "http://localhost:8980/opennms/rest/ifservices?status=F&node.foreignSource=Servers"PUTs (修改数据)
| 资源 | 描述 |
|---|---|
|
更新给定搜索规则匹配的所有配置监控服务。 |
实例:
标记属于分类 Production 的设备上的 ICMP 和 HTTP 服务为强制未管理:
curl -u admin:admin -X PUT "status=F&services=ICMP,HTTP" "http://localhost:8980/opennms/rest/ifservices?category.name=Production"5.9.12. 自定义报表
GETs (读取数据)
| 资源 | 描述 |
|---|---|
|
获取所有自定义报表的列表,包括 ID 和标签。 |
|
通过ID获取指定自定义报表。 |
|
获取所有自定义报表的数量。 |
PUTs (修改数据)
| 资源 | 描述 |
|---|---|
|
修改给定ID的报表。 |
POSTs (创建数据)
文档不完整,参见问题: NMS-7162
DELETEs (删除数据)
文档不完整,参见问题: NMS-7162
5.9.13. 拓扑图
SVG 拓扑图 使用 ReST 填充数据。 这就是这个接口要做的。
GETs (读取数据)
| 资源 | 描述 |
|---|---|
|
获取拓扑图列表。 |
|
获取给定 ID 的拓扑图。 |
|
获取给定 ID 的拓扑图元素 (节点, 链接, 等.)。 |
POSTs (添加数据)
| 资源 | 描述 |
|---|---|
|
添加拓扑图。 |
PUTs (修改数据)
| 资源 | 描述 |
|---|---|
|
更新给定 ID 的拓扑图属性。 |
DELETEs (删除数据)
| 资源 | 描述 |
|---|---|
|
删除给定 ID 的拓扑图。 |
5.9.14. 采集量度 API
指标量度 API 可以用来检索存储在 RRD (或 JRB) 文件和 Newts 中的采集值。
| 除非另有说明,所有时间单位为毫秒。 |
GETs (读取数据)
| 资源 | 描述 |
|---|---|
|
检索单个属性的指标度量值 |
下表显示所有支持的查询字符串参数及其默认值。
| 名称 | 默认值 | 说明 |
|---|---|---|
start |
-14400000 |
时间戳以毫秒为单位。 如果大于 0, 时间戳相对于 UNIX epoch (January 1st 1970 00:00:00 AM)。 如果小于 0, 时间戳与 |
end |
0 |
时间戳以毫秒为单位。如果 <= 0,有效值将是当前时间戳。 |
step |
300000 |
请求行之间的时间间隔。实际步长可能有所不同。 |
maxrows |
0 |
当用指标度量值来生成图形时,这应该被设置为图形的像素宽度。 |
aggregation |
AVERAGE |
使用的计算函数。通常可以是 |
fallback-attribute |
次要属性,在主属性不存在的情况下将被查询。 |
步长
step 参数的特性基于正在使用的时间序列策略。
当使用基于 RRD 的存储策略时, 可用步长大小仅限于创建文件时,由 RRA 定义的那些。 所使用的有效步长将是跨越请求周期的一个,并且最接近所请求的步长。 为了达到最大的精度,使用1作为步长。
当使用 Newts 时,由于在请求时执行聚合,所以可以任意设置步长。
为了帮助防止大的请求,我们限制了最小5分钟的步长,默认的采集速率。
通过设置 org.opennms.newts.query.minimum_step 系统属性,可以降低该值。
基于curl使用实例
curl -u admin:admin "http://127.0.0.1:8980/opennms/rest/measurements/node%5B1%5D.nodeSnmp%5B%5D/CpuRawUser?start=-7200000&maxrows=30&aggregation=AVERAGE"<?xml version="1.0" encoding="UTF-8" standalone="yes"?>
<query-response end="1425588138256" start="1425580938256" step="300000">
<columns>
<values>159.5957271523179</values>
<values>158.08531037527592</values>
<values>158.45835584842285</values>
...
</columns>
<labels>CpuRawUser</labels>
<timestamps>1425581100000</timestamps>
<timestamps>1425581400000</timestamps>
<timestamps>1425581700000</timestamps>
...
</query-response>POSTs (读取数据)
| 资源 | 描述 |
|---|---|
|
检索一个或多个属性,可能跨越多个资源的指标度量值,支持 JEXL 表达式。 |
这里,我们使用 POST 而不是 GET 来检索指标度量值,这允许我们在查询中执行复杂的表达式。 这些请求不能用于更新或创建新的指标度量。
下面是一个可用 POST 实体的实例。
基于 curl 使用实例
curl -X POST -H "Accept: application/json" -H "Content-Type: application/json" -u admin:admin -d @report.json http://127.0.0.1:8980/opennms/rest/measurements{
"start": 1425563626316,
"end": 1425585226316,
"step": 10000,
"maxrows": 1600,
"source": [
{
"aggregation": "AVERAGE",
"attribute": "ifHCInOctets",
"label": "ifHCInOctets",
"resourceId": "nodeSource[Servers:1424038123222].interfaceSnmp[eth0-04013f75f101]",
"transient": "false"
},
{
"aggregation": "AVERAGE",
"attribute": "ifHCOutOctets",
"label": "ifHCOutOctets",
"resourceId": "nodeSource[Servers:1424038123222].interfaceSnmp[eth0-04013f75f101]",
"transient": "true"
}
],
"expression": [
{
"label": "ifHCOutOctetsNeg",
"value": "-1.0 * ifHCOutOctets",
"transient": "false"
}
]
}{
"step": 300000,
"start": 1425563626316,
"end": 1425585226316,
"timestamps": [
1425563700000,
1425564000000,
1425564300000,
...
],
"labels": [
"ifHCInOctets",
"ifHCOutOctetsNeg"
],
"columns": [
{
"values": [
139.94817275747508,
199.0062569213732,
162.6264894795127,
...
]
},
{
"values": [
-151.66179401993355,
-214.7415503875969,
-184.9012624584718,
...
]
}
]
}更高级的表达方式
The JEXL 2.1.x library is used to parse the expression string and this also allows java objects and predefined functions to be included in the expression.
JEXL uses a context which is pre-populated by OpenNMS with the results of the query. Several constants and arrays are also predefined as references in the context by OpenNMS.
| Constant or prefix | Description |
|---|---|
__inf |
Double.POSITIVE_INFINITY |
__neg_inf |
Double.NEGATIVE_INFINITY |
NaN |
Double.NaN |
__E |
java.lang.Math.E |
__PI |
java.lang.Math.PI |
__diff_time |
Time span between start and end of samples |
__i |
Index into the samples array which the present calculation is referencing |
__AttributeName (where AttributeName is the searched for attribute) |
This returns the complete double[] array of samples for AttributeName |
OpenNMS predefines a number of functions for use in expressions which are referenced by namespace:function. All of these functions return a java double value.
Pre defined functions
| Function | Description | Example |
|---|---|---|
jexl:evaluate("_formula"): |
Passes a string to the JEXL engine to be evaluated as if it was entered as a normal expression. Like normal expressions, expressions evaluated through this function will return a Java double value. This makes it possible to reference and evaluate a formula which has been stored in OpenNMS as a string variable. The use case for this capability is that it gives us the ability to define and store a per-node and per-value correction formula which can normalise samples from different sample sources. |
|
math: |
References java.lang.Math class |
math:cos(20) |
strictmath: |
References java.lang.StrictMath class |
math:cos(20) |
fn: |
References the class org.opennms.netmgt.measurements.impl.SampleArrayFunctions. This contains several functions which can reference previous samples in the time series. |
|
fn:arrayNaN("sampleName", n) |
References the nth previous sample in the "sampleName" sample series. Replacing the n samples before the start of the series with NaN. |
fn:arrayNaN("x", 5) |
fn:arrayZero("sampleName", n) |
References the nth previous sample in the "sampleName" sample series. Replacing the n samples before the start of the series with 0 (zero). |
fn:arrayZero("x", 5) |
fn:arrayFirst("sampleName", n) |
References the nth previous sample in the "sampleName" sample series. Replacing the n samples before the start of the series with the first sample. |
fn:arrayFirst("x", 5) |
fn:arrayStart("sampleName", n, constant) |
References the nth previous sample in the "sampleName" sample series. Replacing the n samples before the start of the series with a supplied constant. |
fn:arrayStart("x", 5, 10) |
So for example with these additional variables and functions it is possible to create a Finite Impulse Response (FIR) filter function such as
y = a * f(n) + b * f(n-1) + c * f(n-2)
using the following expression where a,b and c are string constants and x is a time series value
a * x + b * fn:arrayNaN("x", 1) + c * fn:arrayNaN("x", 2)
5.9.15. 设备
| 默认偏移量 offset 为0,默认限制 limit 结果为10。要获取所有的结果,使用限制 limit=0 作为 URL 上的参数(即, GET /nodes?limit=0)。 |
另外,在下面的查询中使用 "id" 的任何地方,都可以使用冒号分隔外部源和外部源ID (例如, GET /nodes/fs:fid)。
GETs (读取数据)
| 资源 | 描述 |
|---|---|
|
获取设备列表。这包括 ID 和设备名称。 |
|
通过 ID 获取指定设备。 |
|
获取与给定设备关联的 IP 接口列表。 |
|
获取给定设备和 IP 地址的 IP 接口。 |
|
获取与给定设备和IP接口相关联的服务列表。 |
|
获取与给定设备、IP接口和服务名相关联的请求服务。 |
|
获取与给定设备关联的 SNMP 接口列表。 |
|
获取与给定设备关联的指定接口和索引。 |
|
获取与给定设备关联的设备分类列表。 |
|
获取与给定设备和设备分类名关联的分类。 |
|
获取与给定设备关联的资产记录。 |
POSTs (添加数据)
POST 需要的 XML 表单数据使用 application/xml 作为 Content-Type。
| 资源 | 描述 |
|---|---|
|
添加设备。 |
|
向设备添加 IP 接口。 |
|
向指定设备的接口添加服务。 |
|
向设备添加 SNMP 接口。 |
|
向设备添加设备分类关联。 |
PUTs (修改数据)
PUT 需要的表单数据使用 application/x-www-form-urlencoded 作为 Content-Type。
| 资源 | 描述 |
|---|---|
|
修改给定ID的设备。 |
|
用给定的设备ID和IP地址修改IP接口。 |
|
使用给定的设备ID,IP地址和服务名修改服务。 |
|
使用给定的设备ID和索引来修改SNMP接口。 |
|
使用给定的设备ID和分类名修改设备分类。 |
DELETEs (删除数据)
执行 DELETE 的单独URLs操作,类似上面的 PUT ,来删除该对象。
| 设备、IP接口和服务的删除是异步的,因此它们将返回 202 (ACCEPTED)。删除 snmpinterfaces 和类别是同步调用,因此它们将在成功时返回 204 (NO_CONTENT)。 |
5.9.16. 通知
| 默认偏移量 offset 为 0,默认限制 limit 为 10 条记录。 要获取所有的结果,使用限制 limit=0 作为 URL 上的参数(即, GET /notifications?limit=0)。 |
GETs (读取数据)
| 资源 | 描述 |
|---|---|
|
获取通知列表。 |
|
获取通知的数量。 (返回明文,而不是 XML 或 JSON。) |
|
获取给定 ID 的通知。 |
若要确认或取消确认通知,请使用 acks 侧功能 — 参见 Acknowledgements。
5.9.17. 故障时间轴
GETs (读取数据)
| 资源 | 描述 |
|---|---|
|
生成时间轴标题 |
|
生成时间轴图像 |
|
为非监控服务生成空时间轴 |
|
生成图像的原始 HTML |
5.9.18. 故障
GETs (读取数据)
| 资源 | 描述 |
|---|---|
|
获取故障清单。 |
|
获取故障数量。 (返回明文,而不是 XML 或 JSON。) |
|
获取给定 ID 的故障。 |
|
获取与指定设备 ID 匹配的故障。 |
5.9.19. Requisitions (设备表单)
RESTful 服务的 OpenNMS Horizon 供应设备表单。 在这个 _API_中,设备的这些“组”被恰当地命名,并作为设备表单。
当前实现了 CRUD 操作,来管理供应设备表单。 设备表单首先是 POSTed,并且不提供 (导入/同步) 操作。 这样做的原因是 a) XML 可以被验证 b) 使得操作可以在稍后的时间发生。 当导入运行时,它们被移入部署状态 (放置在活动的设备表单库中)。
如果请求要获取 active 设备表单,这意味着如果存在就绪请求 (被编辑部署的),则返回就绪设备表单,否则返回已部署的设备表单。 注意,所有这些 添加/删除/修改, 一个 _设备, 接口, 等内容都是指从 设备表单 而不是从数据库本身修改那些元素。 只有在 导入/同步 后才完成操作。
只有在 provision, rest, 或 admin 角色中验证用户,才能编写设备表单数据。
GETs (读取数据)
| 资源 | 描述 |
|---|---|
|
获取所有生效的设备表单。 |
|
获取生效的设备表单数量。 (返回明文,而不是 XML 或 JSON。) |
|
获取所有部署的 (生效的) 设备表单。 |
|
获取部署的设备表单数量。 (返回明文,而不是 XML 或 JSON。) |
|
获取给定外部源名称的有效设备表单。 |
|
获取给定外部源名称的表单里的设备列表。 |
|
获取给定外部源名称及外部 ID 对应的设备。 |
|
获取给定外部源名称及外部 ID 对应的设备接口。 |
|
用指定的外部 ID 和外部源名称获取给定IP接口。 |
|
获取与指定IP地址,外部源 ID,和外部源名称对应的接口服务。 |
|
获取与指定IP地址,外部源 ID,和外部源名称对应的服务。 |
|
获取与指定外部 ID 和外部源名称对应的设备分类。 |
|
获取与指定外部 ID 和外部源名称以及分类名称对应的设备分类。 |
|
获取与指定外部 ID 和外部源名称对应设备资产。 |
|
获取与指定外部 ID 和外部源名称以及资产名称对应的设备资产。 |
POSTs (添加数据或更新现有数据)
| 需要是 JSON/XML |
| 资源 | 描述 |
|---|---|
|
添加 (或替换) 设备表单。 |
|
|
|
在指定的设备表单中添加 (或替换) 给定设备的接口。 |
|
对指定的设备表单中的给定接口添加 (或替换) 服务。 |
|
在指定的设备表单中添加 (或替换) 给定设备的分类。 |
|
在指定的设备表单中添加 (或替换) 给定设备的资产。 |
PUTs (修改数据)
| 需要是 form-urlencoded |
| 资源 | 描述 |
|---|---|
|
对指定的外部源执行 导入/同步。这将使 "活动" 的设备表单变成 "部署" 状态。 |
|
对指定的外部源执行 导入/同步。这将使 "活动" 的设备表单变成 "部署" 状态。现有的设备将不会扫描直到下一个重新扫描周期,只有新添加的设备才会被扫描。这对做一系列改变非常有用。 |
|
更新指定的外部源。 |
|
为给定的外部源更新指定的设备。 |
|
更新给定设备和外部源的指定IP地址。 |
DELETEs (删除数据)
| 资源 | 描述 |
|---|---|
|
删除指定外部源名称的就绪设备表单。 |
|
删除指定外部源名称的生效设备表单。 |
|
从设备表单中删除给定外部 ID 的设备。 |
|
用给定的外部 ID 和外部源删除表单设备的IP地址。 |
|
用给定的IP地址,外部 ID 和外部源删除表单接口的服务。 |
|
用给定的外部 ID 和外部源删除设备的分类。 |
|
用给定的外部 ID 和外部源删除表单设备的资产字段。 |
5.9.20. 资源 API
资源 API 可以用来在设备级别和更下级列出或删除资源。 此服务与 指标度量 API 相结合尤其有用。
GETs (读取数据)
| 资源 | 描述 |
|---|---|
|
检索系统中完整的资源树 (耗时的,谨慎使用) |
|
从命名资源ID开始检索资源树 |
|
给定一个设备的数据库ID或外部源ID |
DELETEs (删除数据)
| 资源 | 描述 |
|---|---|
|
删除指定命名资源ID及其子资源 |
下表显示所有支持的查询字符串参数及其默认值。
| 名称 | 名称 | 说明 |
|---|---|---|
depth |
varies |
只支持 GET。 限制检索资源树的深度。 当列出所有资源时,默认为1,或当列出单个资源时默认为 -1 (无限制)。 |
基于 curl 使用实例
1 的资源树curl -u admin:admin "http://127.0.0.1:8980/opennms/rest/resources/node%5B1%5D"<?xml version="1.0" encoding="UTF-8" standalone="yes"?>
<resource id="node[1]"
label="anode"
name="1"
link="element/node.jsp?node=1"
typeLabel="Node">
<children count="11" totalCount="11">
<resource id="node[1].nodeSnmp[]"
label="Node-level Performance Data"
name=""
typeLabel="SNMP Node Data"
parentId="node[1]">
<children/>
<stringPropertyAttributes/>
<externalValueAttributes/>
<rrdGraphAttributes>
<entry>
<key>loadavg1</key>
<value name="loadavg1"
relativePath="snmp/1"
rrdFile="loadavg1.jrb"/>
</entry>
<key>tcpActiveOpens</key>
<value name="tcpActiveOpens"
relativePath="snmp/1"
rrdFile="tcpActiveOpens.jrb"/>
</entry>
<entry>
<key>memTotalFree</key>
<value name="memTotalFree"
relativePath="snmp/1"
rrdFile="memTotalFree.jrb"/>
</entry>
...
</rrdGraphAttributes>
</resource>
<resource id="node[1].interfaceSnmp[lo]"
label="lo (10 Mbps)"
name="lo"
link="element/snmpinterface.jsp?node=1&ifindex=1"
typeLabel="SNMP Interface Data"
parentId="node[1]">
<children/>
<stringPropertyAttributes>
<entry>
<key>ifName</key>
<value>lo</value>
</entry>
...
</stringPropertyAttributes>
<externalValueAttributes>
<entry>
<key>ifSpeed</key>
<value>10000000</value>
</entry>
<entry>
<key>ifSpeedFriendly</key>
<value>10 Mbps</value>
</entry>
</externalValueAttributes>
<rrdGraphAttributes>
...
<entry>
<key>ifHCInOctets</key>
<value name="ifHCInOctets"
relativePath="snmp/1/lo"
rrdFile="ifHCInOctets.jrb"/>
</entry>
<entry>
<key>ifHCOutOctets</key>
<value name="ifHCOutOctets"
relativePath="snmp/1/lo"
rrdFile="ifHCOutOctets.jrb"/>
</entry>
...
</rrdGraphAttributes>
</resource>
...
</children>
<stringPropertyAttributes/>
<externalValueAttributes/>
<rrdGraphAttributes/>
</resource>1, without having to construct a resource IDcurl -u admin:admin "http://127.0.0.1:8980/opennms/rest/resources/fornode/1"node42 in requisition Servers, by resource IDcurl -u admin:admin "http://127.0.0.1:8980/opennms/rest/resources/nodeSource%5BServers:node42%5D"node42 in requisition Servers, without having to construct a resource IDcurl -u admin:admin "http://127.0.0.1:8980/opennms/rest/resources/fornode/Servers:node42"5.9.21. 实时控制台数据
实时控制台 (RTC) 计算受监控服务的可用性。 从 RTC 提供的数据可用于 ReST API。
GETs (读取数据)
| 资源 | 描述 |
|---|---|
|
从给定的 SLA 类别过滤器获取所有设备和可用性数据,例如,Web Servers (Web+Servers) |
|
获取给定 SLA 类别过滤器的每个设备的可用性数据 |
|
在给定的 SLA 类别过滤器中获取指定设备的详细服务可用性 |
|
获取给定设备上所有服务的详细可用性 |
实例
curl -u demo:demo http://demo.opennms.org/opennms/rest/availability/categories/Web+Servers
curl -u demo:demo http://demo.opennms.org/opennms/rest/availability/categories/nodes
curl -u demo:demo http://demo.opennms.org/opennms/rest/availability/categories/nodes/31
curl -u demo:demo http://demo.opennms.org/opennms/rest/availability/nodes/31
5.9.22. 计划故障
GETs (读取数据)
| 参数 | 描述 |
|---|---|
|
获取配置的计划故障列表。 |
|
获取具体的故障详情。 |
POSTs (设置数据)
| 参数 | 描述 |
|---|---|
|
添加新的故障 (或更新现有的故障)。 |
PUTs (修改数据)
| 参数 | 描述 |
|---|---|
|
向采集包配置中添加特定故障。 |
|
向轮询包配置中添加特定故障。 |
|
向门限包配置中添加特定故障。 |
|
向通知包配置中添加特定故障。 |
DELETEs (删除数据)
| 参数 | 描述 |
|---|---|
|
删除指定故障。 |
|
从采集配置包中删除指定故障。 |
|
从轮询配置包中删除指定故障。 |
|
从门限配置包中删除指定故障。 |
|
从通知配置包中删除指定故障。 |
5.9.23. SNMP 配置
您可以使用该接口编辑IP地址的团体名,SNMP版本等。如果做了与现有 snmp-config.xml 配置重叠的更改,它将根据需要自动创建 <definition /> 条目组。如果没有创建 <definition /> 条目,则匹配默认值。
这里的接口有不同的版本 (见下文)。 支持以下操作:
GETs (读取数据)
| 参数 | 描述 |
|---|---|
|
获取给定IP地址的SNMP配置。 |
|
在给定位置获取指定IP地址的SNMP配置。 |
PUTs (修改数据)
| 参数 | 描述 |
|---|---|
|
为给定的IP地址添加或更新SNMP配置。 |
确定 API 版本
要确定在 OpenNMS Horizon 中运行的 API 版本,请在浏览器中键入 http://localhost:8980/opennms/rest/snmpConfig/1.1.1.1 ,并查看输出:
-
Version 1: 如果输出只有属性
community,port,retries,timeout和version -
Version 2: 如果有比前面描述的更多的属性 (例如,最大重复数)
API 版本1
在版本1中,只支持在 snmp-config.xsd 中定义的几个属性。
在 snmp-info.xsd 中的定义:
<xs:schema
    xmlns:tns="http://xmlns.opennms.org/xsd/config/snmp-info"
    xmlns:xs="http://www.w3.org/2001/XMLSchema"
    elementFormDefault="qualified"
    version="1.0"
    targetNamespace="http://xmlns.opennms.org/xsd/config/snmp-info">
  <xs:element name="snmp-info" type="tns:snmpInfo"/>
  <xs:complexType name="snmpInfo">
    <xs:sequence>
      <xs:element name="community" type="xs:string" minOccurs="0"/>
      <xs:element name="port" type="xs:int"/>
      <xs:element name="retries" type="xs:int"/>
      <xs:element name="timeout" type="xs:int"/>
      <xs:element name="version" type="xs:string" minOccurs="0"/>
    </xs:sequence>
  </xs:complexType>
</xs:schema>
下表显示了所有支持的属性,可选值、限定值以及 snmp-info.xsd 和 snmp-config.xsd 之间的映射。
无论什么版本,都可以设置这些参数。
| snmp-info.xml 的属性 | snmp-config.xml 的属性 | 默认值 | 限于版本 | 限定值 |
|---|---|---|---|---|
version |
version |
v1 |
- |
"v1", "v2c" 或 "v3" 都是有效的参数。 如果提供了无效或空的参数,则使用 "v1"。 |
port |
port |
161 |
- |
Integer > 0 |
retries |
retry |
1 |
- |
Integer > 0 |
timeout |
timeout |
3000 |
- |
Integer > 0 |
community |
read-community |
public |
- |
长度 >= 1 的任何字符串 |
curl -v -X PUT -H "Content-Type: application/xml" \
     -H "Accept: application/xml" \
     -d "<snmp-info>
             <community>yRuSonoZ</community>
             <port>161</port>
             <retries>1</retries>
             <timeout>2000</timeout>
             <version>v2c</version>
          </snmp-info>" \
     -u admin:admin http://localhost:8980/opennms/rest/snmpConfig/10.1.1.1
在 snmp-config.xml 中创建或更新IP地址 10.1.1.1 的 <definition/>-条目。
curl -v -X GET -u admin:admin http://localhost:8980/opennms/rest/snmpConfig/10.1.1.1返回如示例1中定义的IP地址 10.1.1.1 的SNMP配置。
API 版本2
由于版本2 snmp-config.xsd 中定义的 <definition /> 所有属性都可以通过接口设置或获取 - 但是只能通过IP地址进行设置,而不能通过IP地址范围。
这在将来可能会改变。
接口使用 SnmpInfo 对象进行通信。
因此,可以在一个请求中设置 v1 和 v3 参数 (例如 readCommunity 团体名和 privProtocol 字符串)。
但是 OpenNMS Horizon 不允许这样做。
只允许设置没有版本限制的属性 (例如,超时值),或仅限于版本的属性 (例如 readCommunity 团体名,如果是版本 v1/v2c)。
对于从 API 获取数据也是一样的,即使可以手动将 v1 和 v3 参数存储在 snmp-config.xml 中的一个定义块中,但是 ReST API 只返回与版本匹配的参数。
如果没有定义版本,则假定默认值 (无论是 PUT 和 GET 请求)。
SnmpInfo 模型定义如下:
<?xml version="1.0" encoding="UTF-8" standalone="yes"?>
<xs:schema
  elementFormDefault="qualified"
  version="1.0"
  targetNamespace="http://xmlns.opennms.org/xsd/config/snmp-info"
  xmlns:tns="http://xmlns.opennms.org/xsd/config/snmp-info"
  xmlns:xs="http://www.w3.org/2001/XMLSchema">

  <xs:element name="snmp-info" type="tns:snmpInfo"/>
  <xs:complexType name="snmpInfo">
    <xs:sequence>
      <xs:element name="authPassPhrase" type="xs:string" minOccurs="0"/>
      <xs:element name="authProtocol" type="xs:string" minOccurs="0"/>
      <xs:element name="community" type="xs:string" minOccurs="0"/>
      <xs:element name="contextEngineId" type="xs:string" minOccurs="0"/>
      <xs:element name="contextName" type="xs:string" minOccurs="0"/>
      <xs:element name="engineId" type="xs:string" minOccurs="0"/>
      <xs:element name="enterpriseId" type="xs:string" minOccurs="0"/>
      <xs:element name="maxRepetitions" type="xs:int" minOccurs="0"/>
      <xs:element name="maxRequestSize" type="xs:int" minOccurs="0"/>
      <xs:element name="maxVarsPerPdu" type="xs:int" minOccurs="0"/>
      <xs:element name="port" type="xs:int" minOccurs="0"/>
      <xs:element name="privPassPhrase" type="xs:string" minOccurs="0"/>
      <xs:element name="privProtocol" type="xs:string" minOccurs="0"/>
      <xs:element name="proxyHost" type="xs:string" minOccurs="0"/>
      <xs:element name="readCommunity" type="xs:string" minOccurs="0"/>
      <xs:element name="retries" type="xs:int" minOccurs="0"/>
      <xs:element name="securityLevel" type="xs:int" minOccurs="0"/>
      <xs:element name="securityName" type="xs:string" minOccurs="0"/>
      <xs:element name="timeout" type="xs:int" minOccurs="0"/>
      <xs:element name="version" type="xs:string" minOccurs="0"/>
      <xs:element name="writeCommunity" type="xs:string" minOccurs="0"/>
    </xs:sequence>
  </xs:complexType>
</xs:schema>下表显示了所有支持的属性,snmp-info.xsd 和 snmp-config.xsd 之间的映射。
它还列出了版本限制,默认值和限定值 - 如果有的话。
| snmp-info.xml 的属性 | snmp-config.xml 的属性 |
|---|---|
默认值 |
限于版本 |
限定值 |
version |
version |
v1 |
- |
"v1", "v2c" 或 "v3" 是有效的参数。 如果提供了无效或空参数,则使用 "v1"。 |
port |
port |
161 |
- |
Integer > 0 |
retries |
retry |
1 |
- |
Integer > 0 |
timeout |
timeout |
3000 |
- |
Integer > 0 |
maxVarsPerPdu |
max-vars-per-pdu |
10 |
- |
Integer > 0 |
maxRepetitions |
max-repetitions |
2 |
- |
Integer > 0 |
maxRequestSize |
max-request-size |
65535 |
- |
Integer > 0 |
proxyHost |
proxy-host |
- |
|
readCommunity |
|
read-community |
public |
v1, v2c |
|
writeCommunity |
write-community |
private |
v1, v2c |
securityName |
|
security-name |
opennmsUser |
v3 |
|
securityLevel |
security-level |
noAuthNoPriv |
v3 |
Integer value, which can be null, 1, 2, or 3. <ul><li>1 means noAuthNoPriv</li><li>2 means authNoPriv</li><li>3 means authPriv</li></ul> If you do not set the security level manually it is determined automatically: <ul><li>if no authPassPhrase set the securityLevel is 1</li><li>if a authPassPhrase and no privPassPhrase is set the security level is 2.</li><li>if a authPassPhrase and a privPassPhrase is set the security level is 3.</li></ul> |
authPassPhrase |
auth-passphrase |
0p3nNMSv3 |
v3 |
|
authProtocol |
auth-protocol |
MD5 |
v3 |
只有 MD5 或 SHA 是有效参数 |
privPassPhrase |
privacy-passphrase |
0p3nNMSv3 |
v3 |
|
privProtocol |
privacy-protocol |
DES |
v3 |
只有 DES, AES, AES192 或 AES256 是有效参数。 |
engineId |
engine-id |
|
v3 |
|
contextEngineId |
context-engine-id |
v3 |
|
contextName |
|
context-name |
|
v3 |
|
enterpriseId |
enterprise-id |
v3 |
curl -v -X PUT -H "Content-Type: application/xml" \
     -H "Accept: application/xml" \
     -d "<snmp-info>
             <readCommunity>yRuSonoZ</readCommunity>
             <port>161</port>
             <retries>1</retries>
             <timeout>2000</timeout>
             <version>v2c</version>
          </snmp-info>" \
     -u admin:admin http://localhost:8980/opennms/rest/snmpConfig/10.1.1.1
在 snmp-config.xml 中创建或更新IP地址为10.1.1.1的 <definition/>-条目。
curl -v -X GET -u admin:admin http://localhost:8980/opennms/rest/snmpConfig/10.1.1.1返回如示例1中定义的IP地址 10.1.1.1 的SNMP配置。
curl -v -X PUT -H "Content-Type: application/xml" \
     -H "Accept: application/xml" \
     -d "<snmp-info>
             <readCommunity>yRuSonoZ</readCommunity>
             <port>161</port>
             <retries>1</retries>
             <timeout>2000</timeout>
             <version>v1</version>
             <securityName>secret-stuff</securityName>
             <engineId>engineId</engineId>
          </snmp-info>" \
     -u admin:admin http://localhost:8980/opennms/rest/snmpConfig/10.1.1.1
在 snmp-config.xml 中为IP地址 10.1.1.1 创建或更新 <definition/>-条目,忽略属性 securityName 和 engineId。
curl -v -X PUT -H "Content-Type: application/xml" \
     -H "Accept: application/xml" \
     -d "<snmp-info>
             <readCommunity>yRuSonoZ</readCommunity>
             <port>161</port>
             <retries>1</retries>
             <timeout>2000</timeout>
             <version>v3</version>
             <securityName>secret-stuff</securityName>
             <engineId>engineId</engineId>
          </snmp-info>" \
     -u admin:admin http://localhost:8980/opennms/rest/snmpConfig/10.1.1.1
在 snmp-config.xml 中创建或更新一个 <definition/>-条目,忽略 readCommunity 属性。
5.9.24. 用户
由于用户当前没有存储在数据库中,所以它的 ReST 接口不如设备那样完整。
不能使用 hibernate 标准过滤条件。
你首先需要创建文件 $OPENNMS_HOME/etc/users.xml ,然后才能添加或修改用户 (参见 NMS-6469 以获取详细信息)。
|
GETs (读取数据)
| 参数 | 描述 |
|---|---|
|
获取用户列表。 |
|
通过用户名获取用户。 |
POSTs (添加数据)
| 参数 | 描述 |
|---|---|
|
添加用户。如果提供密码,则假定已经加密,在 1.12.5 版本后。
为了指示所提供的密码使用 salted 加密算法,而不是使用旧的 MD5 算法,需要在密码元素后面传递一个名为 |
PUTs (修改数据)
| 参数 | 描述 |
|---|---|
|
更新现有用户的全名,用户说明,密码和时间计划。 |
|
向用户添加安全角色。 (OpenNMS 19 的新功能) |
DELETEs (删除数据)
| 资源 | 描述 |
|---|---|
|
删除用户。 |
|
从用户中移除安全角色。 (OpenNMS 19 的新功能) |
5.9.25. SNMP Trap 北向接口配置
GETs (读取数据)
| 资源 | 描述 |
|---|---|
|
获取配置的完整内容。 |
|
获取 SNMP Trap NBI 的状态(返回 true 或 false)。 |
|
获取当前所有目标名称。 |
|
获取目标名称为 {name} 的内容 |
PUTs (更新默认值)
请求成功后,将通知 SNMP Trap NBI 配置更改。
| 资源 | 描述 |
|---|---|
|
设置 SNMP Trap NBI 的状态。 |
POSTs (添加数据)
POST 需要的表单数据使用 application/x-www-form-urlencoded 作为 Content-Type。
请求成功后,将通知 SNMP Trap NBI 配置更改。
| 资源 | 描述 |
|---|---|
|
更新配置的完整内容。 |
|
添加新的或覆盖现有的目标。 |
PUTs (修改数据)
PUT 需要的表单数据使用 application/x-www-form-urlencoded 作为 Content-Type。
请求成功后,将通知 SNMP Trap NBI 配置更改。
| 资源 | 描述 |
|---|---|
|
更新名为 {name} 的目标内容 |
DELETEs (删除数据)
请求成功后,将通知 SNMP Trap NBI 配置更改。
| 资源 | 描述 |
|---|---|
|
更新目标名为 {name} 的内容 |
5.9.26. Email 北向接口配置
GETs (读取数据)
| 资源 | 描述 |
|---|---|
|
获取配置的完整内容。 |
|
获取 Email NBI 的状态 (返回 true 或 false)。 |
|
获取所有当前目标名称。 |
|
获取目标名称 {name} 的内容 |
PUTs (更新默认值)
一个成功的请求,将通知 Email NBI 关于配置改变。
| 资源 | 描述 |
|---|---|
|
设置 Email NBI 的状态。 |
POSTs (添加数据)
POST 需要的表单数据使用 application/x-www-form-urlencoded 作为 Content-Type。
一个成功的请求,将通知 Email NBI 关于配置改变。
| 资源 | 描述 |
|---|---|
|
添加新的或覆盖现有的目标配置。 |
PUTs (修改数据)
PUT 需要的表单数据使用 application/x-www-form-urlencoded 作为 Content-Type。
一个成功的请求,将通知 Email NBI 关于配置改变。
| 资源 | 描述 |
|---|---|
|
更新目标名为 {name} 的内容 |
DELETEs (删除数据)
一个成功的请求,将通知 Email NBI 关于配置改变。
| 资源 | 描述 |
|---|---|
|
删除名为 {name} 的目标 |
5.9.27. Javamail Configuration
GETs (Reading Data)
| Resource | Description |
|---|---|
|
Get the name of the default readmail config. |
|
Get the name of the default sendmail config. |
|
Get the name of all the existing readmail configurations. |
|
Get the name of all the existing sendmail configurations. |
|
Get the name of all the existing end2end mail configurations. |
|
Get the content of the readmail configuration named {name} |
|
Get the content of the sendmail configuration named {name} |
|
Get the content of the end2end mail configuration named {name} |
POSTs (Adding/Updating Data)
POST requires form data using application/xml or application/json as a Content-Type.
On a successful request, the Email NBI will be notified about the configuration change.
| Resource | Description |
|---|---|
|
Adds a new or overrides an existing readmail configuration. |
|
Adds a new or overrides an existing sendmail configuration. |
|
Adds a new or overrides an existing end2ends mail configuration. |
PUTs (Update defaults)
On a successful request, the Email NBI will be notified about the configuration change.
| Resource | Description |
|---|---|
|
Sets the readmail named {name} as the new default. |
|
Sets the sendmail named {name} as the new default. |
PUTs (Modifying Data)
PUT requires form data using application/x-www-form-urlencoded as a Content-Type.
On a successful request, the Email NBI will be notified about the configuration change.
| Resource | Description |
|---|---|
|
Updates the content of the readmail configuration named {name} |
|
Updates the content of the sendmail configuration named {name} |
|
Updates the content of the end2end mail configuration named {name} |
DELETEs (Remove Data)
On a successful request, the Email NBI will be notified about the configuration change.
| Resource | Description |
|---|---|
|
Removes the readmail configuration named {name} |
|
Removes the sendmail configuration named {name} |
|
Removes the end2end mail configuration named {name} |
5.9.28. Syslog 北向接口配置
GETs (读取数据)
| 资源 | 描述 |
|---|---|
|
获取完整的配置内容。 |
|
获取 Syslog NBI 的状态 (返回 true 或 false)。 |
|
获取当前所有目标名称。 |
|
获取指定名称 {name} 的目标内容。 |
PUTs (更新默认值)
请求成功后,将通知 Syslog NBI 配置更改。
| 资源 | 描述 |
|---|---|
|
设置 Syslog NBI 的状态。 |
POSTs (添加数据)
POST 需要的表单数据使用 application/x-www-form-urlencoded 作为 Content-Type。
请求成功后,将通知 Syslog NBI 配置更改。
| 资源 | 描述 |
|---|---|
|
更新配置的完整内容。 |
|
添加新的或覆盖现有的目标。 |
PUTs (修改数据)
PUT 需要的表单数据使用 application/x-www-form-urlencoded 作为 Content-Type。
请求成功后,将通知 Syslog NBI 配置更改。
| 资源 | 描述 |
|---|---|
|
更新名为 {name} 的目标内容 |
DELETEs (删除数据)
请求成功后,将通知 Syslog NBI 配置更改。
| 资源 | 描述 |
|---|---|
|
更新目标名为 {name} 的内容 |
5.9.29. Business Service Monitoring
Every aspect of the Business Service Monitoring feature can be controlled via a ReST API.
The API’s endpoint for managing Business Services is located at /opennms/api/v2/business-services.
It supports XML content to represent the Business Services.
The schema file describing the API model is located in $OPENNMS_HOME/share/xsds/business-service-dto.xsd.
The responses generated by the ReST API do also include location elements that contain references to other entities managed by the API.
The Business Service response data model for the ReST API has the following basic structure:
<business-service>
  <id>42</id>
  <name>Datacenter North</name>
  <attributes/>
  <ip-service-edges>
    <ip-service-edge>
      <id>23</id>
      <operational-status>WARNING</operational-status>
      <map-function>
        <type>Identity</type>
      </map-function>
      <location>/api/v2/business-services/2/edges/23</location>
      <reduction-keys>
        <reduction-key>uei.opennms.org/nodes/nodeLostService::12:10.10.10.42:ICMP</reductionKey>
        <reduction-key>uei.opennms.org/nodes/nodeDown::12</reductionKey>
      </reduction-keys>
      <weight>1</weight>
    </ip-service-edge>
  </ip-service-edges>
  <reduction-key-edges>
    <reduction-key-edge>
      <id>111</id>
      <operational-status>INDETERMINATE</operational-status>
      <map-function>
        <type>Identity</type>
      </map-function>
      <location>/api/v2/business-services/42/edges/111</location>
      <reduction-keys>
        <reduction-key>my-reduction-key1</reduction-key>
      </reduction-keys>
      <weight>1</weight>
    </reduction-key-edge>
  </reduction-key-edges>
  <child-edges>
    <child-edge>
      <id>123</id>
      <operational-status>MINOR</operational-status>
      <map-function>
        <type>Identity</type>
      </map-function>
      <location>/api/v2/business-services/42/edges/123</location>
      <reduction-keys/>
      <weight>1</weight>
      <child-id>43</child-id>
    </child-edge>
  </child-edges>
  <parent-services><parent-service>144</parent-service></parent-services>
  <reduce-function><type>HighestSeverity</type></reduce-function>
  <operational-status>INDETERMINATE</operational-status>
  <location>/api/v2/business-services/146</location>
</business-service><business-service>
<name>Datacenter North</name>
<attributes/>
<ip-service-edges>
<ip-service-edge>
<ip-service-id>99</ip-service-id>
<map-function>
<type>Identity</type>
</map-function>
<weight>1</weight>
</ip-service-edge>
</ip-service-edges>
<reduction-key-edges>
<reduction-key-edge>
<reduction-key>my-reduction-key1</reduction-key>
<map-function>
<type>Identity</type>
</map-function>
<weight>1</weight>
</reduction-key-edge>
</reduction-key-edges>
<child-edges>
<child-edge>
<child-id>43</child-id>
<map-function>
<type>Identity</type>
</map-function>
<weight>1</weight>
</child-edge>
</child-edges>
<reduce-function><type>HighestSeverity</type></reduce-function>
</business-service>The whole model is defined in jetty-webapps/opennms/WEB-INF/lib/org.opennms.features.bsm.rest.api-*.jar which can be used as a dependency for a Java program to query the API.
GETs (Reading Data)
| Resource | Description |
|---|---|
|
Provides a brief list of all defined Business Services |
|
Returns the Business Service identified by |
|
Returns the edge of the Business Service identified by |
|
Provides a list of supported Map Function definitions |
|
Returns the definition of the Map Function identified by |
|
Provides a list of supported Reduce Function definitions |
|
Returns the definition of the Reduce Function identified by |
PUTs (Modifying Data)
| Resource | Description |
|---|---|
|
Modifies an existing Business Service identified by |
POSTs (Adding Data)
| Resource | Description |
|---|---|
|
Creates a new Business Service |
|
Adds an edge of type IP Service to the Business Service identified by |
|
Adds an edge of type Reduction Key to the Business Service identified by |
|
Adds an edge of type Business Service to the Business Service identified by |
|
Reload the configuration of the Business Service Daemon |
DELETEs (Removing Data)
| Resource | Description |
|---|---|
|
Deletes the Business Service identified by |
|
Removes an edge with the identifier |
5.9.30. 设备发现
此处可以用来触发一次发现扫描。
POSTs (提交一次扫描配置)
| 资源 | 描述 |
|---|---|
|
提交一次扫描配置 |
下面的 XML 结构用于定义扫描任务。
discovery.xml 示例<discoveryConfiguration>
<specifics>
<specific>
<location>Default</location>
<retries>3</retries>
<timeout>2000</timeout>
<foreignSource>My-ForeignSource</foreignSource>
<content>192.0.2.1</content>
</specific>
</specifics>
<includeRanges>
<includeRange>
<location>Default</location>
<retries>3</retries>
<timeout>2000</timeout>
<foreignSource>My-ForeignSource</foreignSource>
<begin>192.0.2.10</begin>
<end>192.0.2.254</end>
</includeRange>
</includeRanges>
<excludeRanges>
<excludeRange>
<begin>192.0.2.60</begin>
<end>192.0.2.65</end>
</excludeRange>
</excludeRanges>
<includeUrls>
<includeUrl>
<location>Default</location>
<retries>3</retries>
<timeout>2000</timeout>
<foreignSource>My-ForeignSource</foreignSource>
<content>http://192.0.2.254/addresses.txt</content>
</includeUrl>
</includeUrls>
</discoveryConfiguration>可以通过将配置发送到 ReST 端,来触发扫描,如下面的例子:
curl -H "Content-Type: application/xml" -u admin:admin -X POST -d @discovery.xml http://localhost:8980/opennms/api/v2/discovery5.9.31. Situation Feedback
Situation Feedback is an optional feature that allows for the management of User Contributed Feedback regarding Correlation of Alarms.
It is a simple API that allows for the submission and retrieval of Correlation Feedback.
GETs (Reading Data)
| Parameter | Description |
|---|---|
|
Get Situation Feedback for the Situation with AlarmId = {situationId}. |
| situationId is the same as the AlarmId for the Situation. |
Usage examples with curl
curl -u admin:admin "http://localhost:8980/opennms/rest/situation-feedback/210"[
{
"situationKey": "uei.opennms.org/alarms/trigger:localhost:0.0.0.0:FEEDBACK_A",
"situationFingerprint": "NDg3ZjdiMjJmNjgzMTJkMmMxYmJjOTNiMWFlYTQ0NWI=",
"alarmKey": "uei.opennms.org/alarms/trigger:localhost:0.0.0.0:ALARM_A",
"feedbackType": "CORRECT",
"reason": "okay",
"user": "admin",
"timestamp": 1535057676107
},
{
"situationKey": "uei.opennms.org/alarms/trigger:localhost:0.0.0.0:FEEDBACK_A",
"situationFingerprint": "NDg3ZjdiMjJmNjgzMTJkMmMxYmJjOTNiMWFlYTQ0NWI=",
"alarmKey": "uei.opennms.org/alarms/trigger:localhost:0.0.0.0:ALARM_B",
"feedbackType": "CORRECT",
"reason": "okay",
"user": "admin",
"timestamp": 1535057676107
}
]POSTs (Adding Data)
POST requires using application/json as a Content-Type.
On a successful request, the Feedback will be persisted
| Resource | Description |
|---|---|
|
Submits feedback for the Situation identitified with AlarmId = {situationId}. |
Usage examples with curl
curl -X POST -H "Accept: application/json" -H "Content-Type: application/json" -u admin:admin -d @feedback.json http://127.0.0.1:8980/opennms/rest/situation-feedback/210[
{
"situationKey": "uei.opennms.org/alarms/trigger:localhost:0.0.0.0:FEEDBACK_A",
"situationFingerprint": "NDg3ZjdiMjJmNjgzMTJkMmMxYmJjOTNiMWFlYTQ0NWI=",
"alarmKey": "uei.opennms.org/alarms/trigger:localhost:0.0.0.0:ALARM_A",
"feedbackType": "CORRECT",
"reason": "okay",
"user": "admin",
"timestamp": 1535057676107
},
{
"situationKey": "uei.opennms.org/alarms/trigger:localhost:0.0.0.0:FEEDBACK_A",
"situationFingerprint": "NDg3ZjdiMjJmNjgzMTJkMmMxYmJjOTNiMWFlYTQ0NWI=",
"alarmKey": "uei.opennms.org/alarms/trigger:localhost:0.0.0.0:ALARM_B",
"feedbackType": "CORRECT",
"reason": "okay",
"user": "admin",
"timestamp": 1535057676107
}
]204 No Content
5.10. ReST API Examples
5.10.1. 获得性能图表
虽然图表在 ReST 技术上是不可用的,但是你可以解析一些 ReST 变量以获得足够的数据来拉取图表。 这不是理想方式,因为它需要多次获取,但要看你的需求,可能是满足需要的。
我内嵌了一些 PHP 样例代码,做法是 (根本没有测试,我没有使用 ReST-接口从旧的的代码剪切和复制,和/或使用浏览器,像 YMMV)。 如果你在网管界面上单击资源图,然后右键点击你想要的图标,点击 _查看图像 ,你可以得到拉取图表的完整 URL 。
使用这个获取的 URL ,就可以从 ReST 拉取你想要的图标。
function fetchit($thing, $user = "user", $pass = "pass") {
    $url = "http://localhost:8980/opennms";
    $ch = curl_init();
    curl_setopt($ch, CURLOPT_URL, $url . $thing);
    curl_setopt($ch, CURLOPT_HEADER, 0);
    curl_setopt($ch, CURLOPT_RETURNTRANSFER, 1);
    curl_setopt($ch, CURLOPT_USERAGENT, $useragent);
    curl_setopt($ch, CURLOPT_USERPWD, $user.':'.$pass);
    $data = curl_exec($ch);
    curl_close($ch);
    return $data;
}

// this assumes you already have found the nodeId via a previous REST call or some other means.  Provided more as an example than what you might want.
function getNodeInterfaces($nodeId) {
    $data = fetchit("/rest/nodes/$nodeId/snmpinterfaces");
     return simplexml_load_string($data);
}

function fetchGraphs($nodeId) {
     $ints = getNodeInterfaces($nodeId);
     $chars = array('/','.',':','-',' ');
     $endtime = time();
     $starttime = (string)(time() - ($days * 24 * 60 * 60)) ;

     // use bcmath or a better version of PHP if  you don't want this hypocrisy here.
     $endtime = $endtime . '000';
     $starttime = $starttime . '000';

     for($i=0; $i<count($ints->snmpInterfaces); $i++) {
         $ifname = $ints->snmpInterfaces[$i]->snmpInterface->ifName;
         $mac = $ints->snmpInterfaces[$i]->snmpInterface->physAddr;
         $if = str_replace($chars, "_", $ifname);
         if ( strlen(trim($mac)) < 12 ) { $mac_and_if = $if; } else { $mac_and_if = $if .'-'. $mac; };

         $image = fetchit("$url/graph/graph.png?resource=node[$nodeId].interfaceSnmp[$mac_and_if]&report=report=mib2.HCbits&start=$starttime&end=$endtime");
         // you can poop this to a file now, or set header('Content-type: image/png'); then print "$image";
     }
}
5.10.2. Provisioning 示例和注释
测试新的 ReST 接口一种方法是使用 provision.pl。
运行它会得到一个输出摘要,但不完全清楚它是如何工作的。
下面是使用 ReST 接口添加新设备的示例:
# add a new foreign source called ubr
/usr/share/opennms/bin/provision.pl requisition add ubr
/usr/share/opennms/bin/provision.pl node add ubr 10341111 clownbox
/usr/share/opennms/bin/provision.pl node set ubr 10341111 city clownville
/usr/share/opennms/bin/provision.pl node set ubr 10341111 building clown-town-hall
/usr/share/opennms/bin/provision.pl node set ubr 10341111 parent-foreign-id 1122114
/usr/share/opennms/bin/provision.pl interface add ubr 10341111 10.1.3.4

# this is like a commit.  No changes will take effect until you import a foreign source
/usr/share/opennms/bin/provision.pl requisition import ubr
你可能需要指定管理员的 用户名/密码。像这样:
--username=admin --password=clownnms
到命令行。
5.10.3. Debian (Lenny) 笔记
对于 Lenny 来说,你需要安装一个包来保证正常工作。
依据 http://backports.org/dokuwiki/doku.php?id=instructions 说明将其添加到 sources.list。
# install liburi-perl from backports
sudo apt-get -t lenny-backports install liburi-perl
5.10.4. Windows Powershell ReST
使用 Windows Powershell 通过 ReST 来填充一些资产字段的例子。
# Installdate of Windows
$wmi = Get-WmiObject -Class Win32_OperatingSystem
$dateInstalled = $wmi.ConvertToDateTime($wmi.InstallDate)

# Serialnumber and manufacturer of server
Get-WmiObject win32_bios | select SerialNumber
$wmi = Get-WmiObject -Class win32_bios
$manufacturer = $wmi.Manufacturer

# Text file with a description of the server for the comments field
$comment = Get-Content "C:\Program Files\BGInfo\Info_Description.txt" | Out-String

$user ="admin"
$pass= "admin"

$secpasswd = ConvertTo-SecureString $user -AsPlainText -Force
$cred = New-Object System.Management.Automation.PSCredential ($pass, $secpasswd)

$nodeid = Invoke-RestMethod -Uri http://opennms.domain.nl:8980/opennms/rest/nodes?label=servername.domain.nl -Credential $cred
$nodeid = $nodeid.nodes.node.id

$uri="http://opennms.domain.nl:8980/opennms/rest/nodes/$nodeid/assetRecord"

Invoke-RestMethod -Uri "http://opennms.massxess.nl:8980/opennms/rest/nodes/$nodeid/assetRecord/?building=133" -Credential $cred -Method PUT
Invoke-RestMethod -Uri "$uri/?manufacturer=$manufacturer" -Credential $cred -Method PUT
Invoke-RestMethod -Uri "$uri/?dateInstalled=$dateInstalled" -Credential $cred -Method PUT
Invoke-RestMethod -Uri "$uri/?comment=$comment" -Credential $cred -Method PUT
6. Develop Documentation
This document is the guideline for people who wish to contribute to writing documentation for the OpenNMS project. The OpenNMS software is free and open source, contribution of any kind is welcome. We ask that you observe the rules and guidelines outlined here to maintain consistency across the project.
Each (sub)project is represented as a section of the documentation.
Each section will produce a HTML output in the file system that is generated in the target/generated sources folder.
The chosen file format for documentation is AsciiDoc (Asciidoc Homepage).
Document files use the .adoc file extension.
Note that there are different ways to contribute documentation, each suitable for the different use cases:
-
Tutorials and How To’s should be published on the OpenNMS Wiki. For example: you want to describe how to use the Net-SNMP agent and the SNMP monitor from OpenNMS to solve a special use case with OpenNMS.
-
The documentation in the source code should be formal technical documentation. The writing style should be accurate and concise. However, ensure that you explain concepts in detail and do not make omissions.
6.1. File Structure in opennms-doc
| Directory | Contents |
|---|---|
|
module with the guide for administrators configuring, optimizing and running OpenNMS |
|
module with the guide for those who want to develop OpenNMS |
|
module with the guide of how to install OpenNMS on different operating systems |
|
module with the changelog and release notes |
6.2. Writing
The following rules will help you to commit correctly formatted and prepared documentation for inclusion in the OpenNMS project. It is important that we maintain a level of consistency across all of our committers and the documentation they produce.
When writing place a single sentence on each line. This makes it easy to move content around, and also easy to spot long, or fragmented, sentences. This will also allow us to assign comments on a sentence in GitHub which will facilitate easier merging.
| Other than writing documentation, you can help out by providing comments on documentation, reviewing, suggesting improvements or reporting bugs. To do this head over to: issue tracker for documentation! |
6.2.1. Conventions for text formatting
The following conventions are used:
-
File names and path are written in `poller-configuration.xml` they will be rendered in:
poller-configuration.xml; -
Names that indicate special attention, e.g. this configuration matches *any* entry: this is rendered as: this configuration matches any entry;
-
_Italics_ is rendered as Italics and used for emphasis and indicate internal names and abbreviations;
-
*Bold* is rendered as Bold and should be used sparingly, for strong emphasis only;
-
+methodName()+ is rendered as methodName() and is also used for literals, (note: the content between the
+signs will be parsed); -
`command` is rendered as
command(typically used for command-line or parts used in configuration files), (note: the content between the ` signs will not be parsed); -
`my/path/` is rendered as
my/path/this is used for file names and paths; -
\``double quote'' (which is two grave accents to the left and two acute accents to the right) renders as ``double quote'';
-
\`single quote' (which is a single grave accent to the left and a single acute accent to the right) renders as `single quote'.
6.2.2. Gotchas
-
Always leave a blank line at the top of the documents section. It might be the title ends up in the last paragraph of the document;
-
Start in line 2 setting a relative path to the images directory to picture rendering on GitHub:
// Allow image rendering
:imagesdir: relative/path/to/images/dir-
Always leave a blank line at the end of documents;
-
As {} are used for Asciidoc attributes, everything inside will be treated as an attribute. To avoid this you have to escape the opening brace: \\{. If you do not escape the opening brace, the braces and the text inside them will be removed without any warning being issued!;
-
Forcing line breaks can be achieved with ` +` at the end of the line followed by a line break.
This is the first line +
and this a forced 2nd lineThis is the first line
and this a forced 2nd line
6.3. Headings and document structure
Each document starts over with headings from level zero (the document title). Each document should have an id. In some cases sections in the document need to have id’s as well, this depends on where they fit in the overall structure. If you wish to have a link to specific content that content has to have an id. A missing id in a mandatory place will cause the build to fail.
To start a document:
[[unique-id-verbose-is-ok]]
= The Document Title
If you are including the document inside another document and you need to push the headings down to the right level in the output, the leveloffset attribute is used.
Subsequent headings in a document should use the following syntax:
== Subheading

... content here ...

=== Subsubheading

content here ...
6.4. Links
When you need to link to other parts of the manual you use the target id. To use a target id you follow this syntax:
<<doc-guidelines-links>>This will render as: Links
| To use the target id in you document simply write the target id in your text, for example: |
see <<target-id>>
this should suffice for most cases.
If you need to link to another document with your own link text, then follow this procedure:
<<target-id, link text that fits in the context>>| Having lots of linked text may work well in a web context but is a distracting in print. The documentation we are creating is intended for both mediums so be considerate of this in your usage. |
If you wish to use an external link, they are are added as:
http://www.opennms.org/[Link text here]This will render in the output as: Link text here
For short links it may be beneficial not to use accompanying link text:
http://www.opennms.org/Which renders as: http://www.opennms.org/
| It is acceptable to have a period trailing after the URL, it will not render as a part of the link. |
6.5. Admonitions and useful notes
These are useful for defining specific sections, such as Notes, Tips and Important information. We encourage the use of them in the documentation as long as they are used appropriately. Choose from the following:
NOTE: This is my note.This is how its rendered:
| This is my note. |
TIP: This is my tip.This is how its rendered:
| This is my tip. |
IMPORTANT: This is my important hint.This is how its rendered:
| This is my important hint. |
CAUTION: This is my caution.This is how its rendered:
| This is my caution. |
WARNING: This is my warning.This is how its rendered:
| This is my warning. |
A multiline variation:
TIP: Tiptext. +
     Line 2.
Which is rendered as:
|
Tiptext. Line 2. |
| Remember to write these in full caps. There is no easy manner in which to add new admonitions, do not create your own. |
6.6. Attributes
Common attributes you can use in documents:
-
{opennms-version} - rendered as "23.0.1"
These can substitute part of URLs that point to, for example, APIdocs or source code. Note that opennms-git-tag also handles the case of snapshot/master.
Sample Asciidoc attributes which can be used:
-
{docdir} - root directory of the documents
-
{nbsp} - non-breaking space
6.7. Comments
There’s a separate build that includes comments.
When the comments are used they show up with a yellow background.
This build doesn’t run by default, but after a normal build, you can use make annotated to create a build yourself.
You can use the resulting 'annotated' page to search for content as the full manual is a single page.
To write a comment:
// this is a commentComments are not visible in the standard build. Comment blocks won’t be included in the output of any build. The syntax for a comment block is:
////
Note that includes in here will still be processed, but not make it into the output.
That is, missing includes here will still break the build!
////
6.8. Tables
For representing structured information you can use tables. A table is constructed in the following manner:
[options="header, autowidth"]
|===
| Parameter     | Description                | Required | Default value
| `myFirstParm` | my first long description  | required | `myDefault`
| `myScndParm`  | my second long description | required | `myDefault`
|===
This is rendered as:
| Parameter | Description | Required | Default value |
|---|---|---|---|
|
my first long description |
required |
|
|
my second long description |
required |
|
| Please align your columns in the AsciiDoc source in order to give better readability when editing in text view. If you have a very long description, break at 120 characters and align the text to improve source readability. |

this is rendered as:
| Parameter | Description | Required | Default value |
|---|---|---|---|
|
Authentication credentials to perform basic authentication.
Credentials should comply to RFC1945 section 11.1,
without the Base64 encoding part. That’s: be a string made of the concatenation of: |
optional |
|
|
Additional headers to be sent along with the request. Example of valid parameter’s names are
|
optional |
|
6.9. Include images
When visualizing complex problems you can help the explanation and provide greater information by using an image. We use in OpenNMS documentation modules two directories for images.
The image folder structure mirrors the text structure. In this case it is a little bit easier to locate the AsciiDoc text file where the image is included.
.
└── opennms-doc(1)
    └── guide-doc(2)
        ├── README.adoc
        ├── pom.xml
        ├── src(3)
        |   └── asciidoc(4)
        |       ├── configs
        |       |   └── poller-configuration.xml
        |       ├── images(5)
        |       |   ├── 01_opennms-logo.png(6)
        |       |   └── 02_pris-overview.png
        |       ├── images_src(7)
        |       |   └── pris-overview.graphml(8)
        |       ├── index.adoc(9)
        |       └── text
        |           ├── images.adoc(10)
        |           ├── include-source.adoc
        |           ├── introduction.adoc
        |           └── writing.adoc
└── target(11)| 1 | This folder contains all documentation modules; |
| 2 | The module for this documentation for target group of documentation contributors; |
| 3 | Indicates a source folder; |
| 4 | The documentation root folder; |
| 5 | Folder for images. Images should be *.png or *.jpg if included in the documentation; |
| 6 | The image used, the format is a leading <number>_ followed by a name using no spaces; |
| 7 | Some images are created from tools like yED, this folder should contain the editable version of the file with the same file name; |
| 8 | Editable version of the image source file, note no spaces in the name; |
| 9 | Main document file which includes all documentation parts and is rendered as index.html for the web; |
| 10 | AsciiDoc source file which can include images; |
| 11 | Target folder with generated HTML output after mvn clean package has been performed; |
| All images in the entire manual share the same namespace, it is therefore best practice to use unique identifiers for images. |
To include an image file, make sure that it resides in the 'images/' directory relative to the document you’re including it within. Then use the following syntax for inclusion in the document:
.This is a caption of the image
image::docs/02_opennms-logo.png[]
Which is rendered as:
| The image path for the images you include is relative to the *.adoc source file, where you use the image. |
6.10. Code Snippets
You can include code snippets, configuration- or source code files in the documentation. You can enable syntax highlighting by providing the given language parameter, this will work on source code or configuration.
6.10.1. Explicitly defined in the document
| be careful to use this kind of code snippets as sparsely as possible. Code becomes obsolete very quickly, archaic usage practices are detrimental. |
if you do wish to include snippets use the following method:
<service name="DNS" interval="300000" user-defined="false" status="on">
  <parameter key="retry" value="2" />
  <parameter key="timeout" value="5000" />
  <parameter key="port" value="53" />
  <parameter key="lookup" value="localhost" />
  <parameter key="fatal-response-codes" value="2,3,5" /><!-- ServFail, NXDomain, Refused -->
  <parameter key="rrd-repository" value="/opt/opennms/share/rrd/response" />
  <parameter key="rrd-base-name" value="dns" />
  <parameter key="ds-name" value="dns" />
</service>
If there’s no suitable syntax highlighter for the code used just omit the language: [source].
Currently the following syntax highlighters are enabled:
-
Bash
-
Groovy
-
Java
-
JavaScript
-
Python
-
XML
For other highlighters that could be added see https://code.google.com/p/google-code-prettify/.
6.10.2. Included from an example file
You can include source or configuration from an external file. In this way you can provide a working example configuration maintaining doc and example at the same time. The procedure and rules are the same as with images, the path is relative to the *.adoc file where the file to be used is included.
[source,xml]
----
include::../configs/wmi-config.xml[]
----
This is how it’s rendered:
<?xml version="1.0"?>
<wmi-config retry="2" timeout="1500"
	username="Administrator" domain="WORKGROUP" password="password">
</wmi-config>
6.10.3. Include parts of a file
If you want to include just a specific segment of a large configuration file, you can assign tags that indicate to AsciiDoc the section that is to be included. In this example just the service definition of the ICMP monitor should be included.
In the 'poller-configuration.xml' tag the section in the following manner:
...
<rrd step="300">
  <rra>RRA:AVERAGE:0.5:1:2016</rra>
  <rra>RRA:AVERAGE:0.5:12:1488</rra>
  <rra>RRA:AVERAGE:0.5:288:366</rra>
  <rra>RRA:MAX:0.5:288:366</rra>
  <rra>RRA:MIN:0.5:288:366</rra>
</rrd>
<!-- # tag::IcmpServiceConfig[] -->
<service name="ICMP" interval="300000" user-defined="false" status="on">
  <parameter key="retry" value="2" />
  <parameter key="timeout" value="3000" />
  <parameter key="rrd-repository" value="/opt/opennms/share/rrd/response" />
  <parameter key="rrd-base-name" value="icmp" />
  <parameter key="ds-name" value="icmp" />
</service>
<!-- # end::IcmpServiceConfig[] -->
<service name="DNS" interval="300000" user-defined="false" status="on">
  <parameter key="retry" value="2" />
  <parameter key="timeout" value="5000" />
  <parameter key="port" value="53" />
...[source,xml] ---- include::../configs/poller-configuration.xml[tags=IcmpServiceConfig] ----
    <service name="ICMP" interval="300000" user-defined="false" status="on">
      <parameter key="retry" value="2" />
      <parameter key="timeout" value="3000" />
      <parameter key="rrd-repository" value="/opt/opennms/share/rrd/response" />
      <parameter key="rrd-base-name" value="icmp" />
      <parameter key="ds-name" value="icmp" />
</service>| Spaces and tabs are taken from the original file. |
6.11. Cheat Sheets and additional hints
The documentation uses the AsciiDoc format. There are a number of guides that will help you to get started with using AsciiDoc:
For other resources, to gain familiarity with AsciiDoc, you can visit:
6.12. Migrating content from project wiki
The project wiki contains much information that ought to be migrated to the official documentation set. To help with this effort, we have a wiki template which informs readers of articles that are tagged for migration to the official docs, or that have already been migrated. When you identify an article in the OpenNMS wiki whose information should be migrated (either in its entirety, or just individual sections), use the following process.
-
If you do not already have a wiki account, request one before getting started. Your request must be approved by a wiki admin. If you don’t get approved within a day, send a note to the opennms-devel mailing list or on the OpenNMS Development chat channel.
-
Create an issue in the project issue tracker, in project NMS. Note the issue number; you will use it below.
-
After logging in to the wiki, visit the article whose content should be migrated.
-
Click on the Edit Source link at the top of the article view.
-
Add text like the following to the top of the article source editor:
{{OfficialDocs | scope=article | guide=admin | issue=NMS-9926 | date=March 2018 | completed=false}}-
The value of the
scopeattribute must be eitherarticle, if the entire article should be migrated,orsectionif only specific section(s) should be migrated.-
When using
scope = section, it’s fine to use this template multiple times in a single article.
-
-
The value of the
guideattribute must be one ofadmin,development,install, oruser.-
If the information in an article should be migrated to multiple official guides, use multiple instances of the
{{OfficialDocs}}template; try to target these by section when possible.
-
-
The value of the
issueparameter must be a valid issue ID in the project issue tracker, and will become a live link -
The value of the
dateparameter should be the month and year when the tag was added, e.g.March 2018. -
The
completedparameter is optional; it is assumed to be false if omitted, or true if its value is eithertrueoryes.
OfficialDocs template usage-
Enter an edit summary such as Tagged for migration to official docs, NMS-12345 and click Show preview
-
After verifying that your changes render as expected (see image), click Save changes.

OfficialDocs wiki template on an article pending migration-
Migrate the information, making sure to follow the guidelines laid out earlier in this section; do not just copy and paste, and watch out for obsolete information. If you need help, contact the developers through one of the methods mentioned above.
-
Once the migration is complete and the issue is closed, edit the wiki article again and change
completed=falsetocompleted=true. -
The rendering of the template will change to indicate that the migration has been completed.

OfficialDocs wiki template on an article whose migration is completedAdding the {{OfficialDocs}} template to an article will implicitly add that article to a pair of wiki categories:
-
Migration to official docs pending or Migration to official docs completed, according to the value of the
completedattribute -
Migrate to
Xguide, according to the value of theguideattribute
7. AMQP Integration
The AMQP Integration allows external systems to communicate with the event bus of OpenNMS Horizon and receive alarms via the AMQP protocol.
| AMQP is standard messaging protocol supported by a number of brokers including ActiveMQ and QPID. |
The integration is written using Camel + OSGi and has the following components:
-
Event Forwarder
-
Event Receiver
-
Alarm Northbounder
Custom filtering (i.e. which events to forward) and transformations (i.e. how the events are represented in the messages) can be used in each of the components. Generic implementations
| Each componenent can be configured and setup independently, i.e. you can choose to only forward alarms. |
7.1. Event Forwarder
The event forwarder listens for all events on the internal event bus of OpenNMS Horizon. Events from the bus are sent to a Camel processor, which can filter or transform these, before being sent to the AMQP endpoint.
The event forwarder exposes the following properties via the org.opennms.features.amqp.eventforwarder pid:
| Property | Default | Description |
|---|---|---|
connectionUrl |
amqp://localhost:5672 |
Used by the JmsConnectionFactory. See AMQP for details. |
username |
guest |
Username |
password |
guest |
Password |
destination |
amqp:topic:opennms-events |
Target queue or topic. See AMQP for details. |
processorName |
default-event-forwarder-processor |
Named |
The default processor, the default-event-forwarder-processor, marshalls events to XML and does not perform any filtering.
This means that when enabled, all events will be forwarded to the AMQP destination with XML strings as the message body.
7.1.1. Setup
Start by logging into a Karaf shell.
Update the properties with your deployment specific values:
config:edit org.opennms.features.amqp.eventforwarder
config:property-set connectionUrl amqp://localhost:5672
config:property-set destination amqp:topic:opennms-events
config:property-set processorName default-event-forwarder-processor
config:update
Install the feature:
feature:install opennms-amqp-event-forwarder7.1.2. Debugging
You can get detailed information on the Camel route using:
camel:route-info forwardEvent7.2. Event Receiver
The event receiver listens for messages from an AMQP target and forwards them onto the internal event bus of OpenNMS Horizon. Messages are sent to a Camel processor, which can filter or transform these, before being sent onto the event bus.
The event receiver exposes the following properties via the org.opennms.features.amqp.eventreceiver pid:
| Property | Default | Description |
|---|---|---|
connectionUrl |
amqp://localhost:5672 |
Used by the JmsConnectionFactory. See AMQP for details. |
username |
guest |
Username |
password |
guest |
Password |
source |
amqp:queue:opennms-events |
Source queue or topic. See AMQP for details. |
processorName |
default-event-receiver-processor |
Named |
The default processor, the default-event-receiver-processor, expects the message bodies to contain XML strings which are it unmarshalls to events.
7.2.1. Setup
Start by logging into a Karaf shell.
Update the properties with your deployment specific values:
config:edit org.opennms.features.amqp.eventreceiver
config:property-set connectionUrl amqp://localhost:5672
config:property-set source amqp:queue:opennms-events
config:property-set processorName default-event-receiver-processor
config:update
Install the feature:
feature:install opennms-amqp-event-receiver7.2.2. Debugging
You can get detailed information on the Camel route using:
camel:route-info receiveEvent7.3. Alarm Northbounder
The alarm northbounder listens for all northbound alarms. Alarms are sent to a Camel processor, which can filter or transform these, before being sent to the AMQP endpoint.
The alarm northbounder exposes the following properties via the org.opennms.features.amqp.alarmnorthbounder pid:
| Property | Default | Description |
|---|---|---|
connectionUrl |
amqp://localhost:5672 |
Used by the JmsConnectionFactory. See AMQP for details. |
username |
guest |
Username |
password |
guest |
Password |
destination |
amqp:topic:opennms-alarms |
Target queue or topic. See AMQP for details. |
processorName |
default-alarm-northbounder-processor |
Named |
The default processor, the default-alarm-northbounder-processor, converts the alarms to a string and does not perform any filtering.
This means that when enabled, all alarms will be forwarded to the AMQP destination with strings as the message body.
7.3.1. Setup
Start by logging into a Karaf shell.
Update the properties with your deployment specific values:
config:edit org.opennms.features.amqp.alarmnorthbounder
config:property-set connectionUrl amqp://localhost:5672
config:property-set destination amqp:topic:opennms-alarms
config:property-set processorName default-alarm-northbounder-processor
config:update
Install the feature:
feature:install opennms-amqp-alarm-northbounder7.3.2. Debugging
You can get detailed information on the Camel route using:
camel:route-info forwardAlarm7.4. Custom Processors
If your integration requires specific filtering and or formatting, you can write your own processor by implementing the org.apache.camel.Processor interface.
For example, we can implement a custom processor used for event forwarding:
import org.apache.camel.Exchange;
import org.apache.camel.Processor;

public class MyEventProcessor implements Processor {
    @Override
    public void process(final Exchange exchange) throws Exception {
        final Event event = exchange.getIn().getBody(Event.class);

        // Filtering
        if (!shouldForward(event)) {
            exchange.setProperty(Exchange.ROUTE_STOP, Boolean.TRUE);
            return;
        }

        // Transforming
        MyDTO eventAsDTO = toDTO(event);
        exchange.getIn().setBody(eventAsDTO, MyDTO.class);
    }
}
In order to use the processor, package it as a bundle, and expose it to the OSGi service registry using:
<bean id="myEventProcessor" class="org.opennms.integrations.evilcorp.MyEventProcessor" />

<service id="myEventProcessorService" ref="myEventProcessor" interface="org.apache.camel.Processor">
  <service-properties>
    <entry key="name" value="evilcorp-event-forwarder-processor"/>
  </service-properties>
</service>
Once your bundle in the Karaf container, you can update the loaded you can refer to your processor with:
config:edit org.opennms.features.amqp.eventforwarder
config:property-set processorName evilcorp-event-forwarder-processor
config:update
If the event forwarder feature was already started, it should automatically restart and start using the new processor. Otherwise, you can start the feature with:
feature:install opennms-amqp-event-forwarder8. Design and Styleguidelines
8.1. Jasper Report Guideline
Building and contributing JasperReports is a way to contribute to the project. To make it easier to maintain and style reports the following layout guideline can be used to have similar and more consistent report layout.
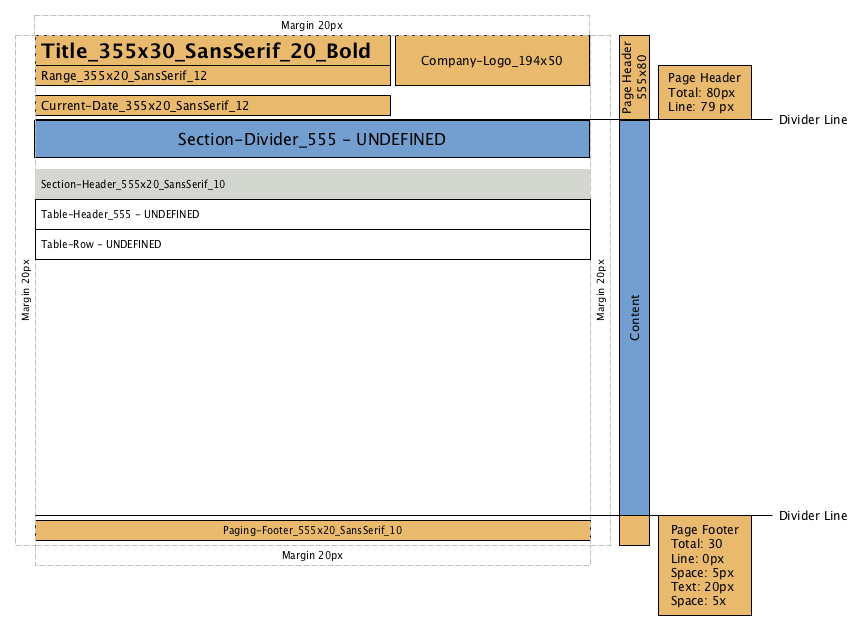
The following formatting can be applied:
| Type | Convention |
|---|---|
Date |
yyyy/MM/dd HH:mm:ss |
Report Range |
Report Begin: ${startDate} Report End: ${endDate} |
Paging |
Page ${current} of ${total} |
| Based on this template definition there exist a GitHub repository which contains a JasperReport template. |